Lexus NX: Power Outlet Socket
Components
COMPONENTS
ILLUSTRATION
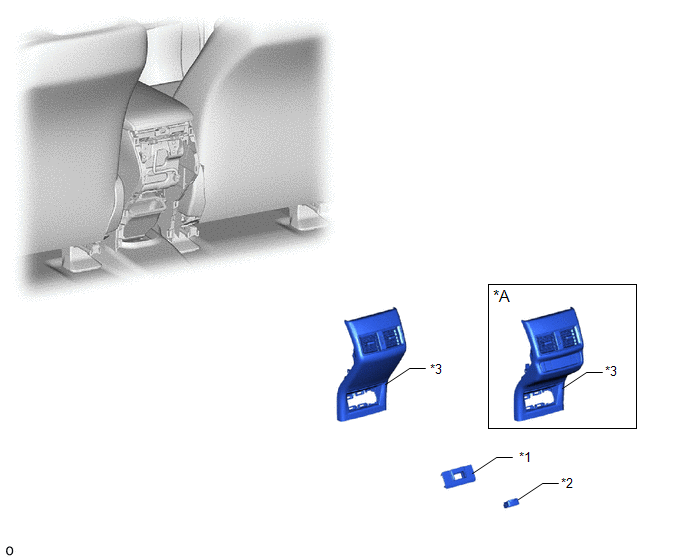
| *A | w/ Rear Seat Heater | - | - |
| *1 | CIGARETTE LIGHTER COVER | *2 | NO. 2 POWER OUTLET SOCKET ASSEMBLY |
| *3 | REAR CONSOLE END PANEL SUB-ASSEMBLY | - | - |
Removal
REMOVAL
PROCEDURE
1. REMOVE REAR CONSOLE END PANEL SUB-ASSEMBLY
Click here .gif)
2. REMOVE CIGARETTE LIGHTER COVER
Click here
3. REMOVE NO. 2 POWER OUTLET SOCKET ASSEMBLY
| (a) Detach the 2 claws and remove the No. 2 power outlet socket assembly. |
|

Installation
INSTALLATION
PROCEDURE
1. INSTALL NO. 2 POWER OUTLET SOCKET ASSEMBLY
(a) Attach the 2 claws to install the No. 2 power outlet socket assembly.
2. INSTALL CIGARETTE LIGHTER COVER
Click here .gif)
3. INSTALL REAR CONSOLE END PANEL SUB-ASSEMBLY
Click here
READ NEXT:
 Components
COMPONENTS ILLUSTRATION *1 DECK TRIM SIDE PANEL ASSEMBLY LH *2 LUGGAGE HOLD BELT STRIKER ASSEMBLY *3 NO. 1 LUGGAGE COMPARTMENT TRIM HOOK *4 REAR DOOR OPENING TRIM WEATHERSTRIP LH
Removal
REMOVAL PROCEDURE 1. REMOVE REAR SEAT ASSEMBLY (a) for Power Seat: Click here (b) for Manual Seat: Click here 2. REMOVE REAR FLOOR FINISH PLATE Click here 3. REMOVE REAR DOOR OPENING TRIM W
SEE MORE:
Parts Location
PARTS LOCATION ILLUSTRATION *A w/ Memory *B for Triple Beam Headlight *1 OUTER REAR VIEW MIRROR ASSEMBLY RH - SIDE TURN SIGNAL LIGHT ASSEMBLY RH *2 OUTER REAR VIEW MIRROR ASSEMBLY LH - SIDE TURN SIGNAL LIGHT ASSEMBLY LH *3 OUTER MIRROR CONTROL ECU ASSEMBLY RH *4 OUTER M
How To Proceed With Troubleshooting
CAUTION / NOTICE / HINT HINT:
Use the following procedures to troubleshoot the steering lock system.
*: Use the Techstream.
PROCEDURE 1. VEHICLE BROUGHT TO WORKSHOP
NEXT 2. CUSTOMER PROBLEM ANALYSIS (a) Interview the customer and confirm the problem. Click
© 2016-2026 Copyright www.lexunx.com
