Lexus NX: Installation
INSTALLATION
PROCEDURE
1. INSTALL STEERING PAD ASSEMBLY
(a) Check that the power switch is off.
(b) Check that the cable is disconnected from the negative (-) auxiliary battery terminal.
CAUTION:
Wait at least 90 seconds after disconnecting the cable from the negative (-) auxiliary battery terminal to disable the SRS system.
(c) Support the steering pad assembly with one hand.
| (d) Connect the airbag connector and lock the connector lock. NOTICE:
HINT: Use the same procedure to connect the airbag connector on the other side. |
|
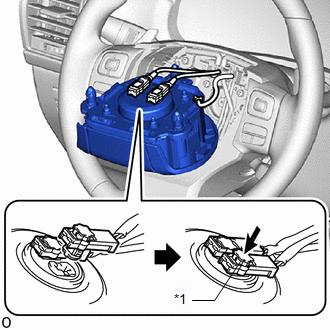
(e) Connect the horn connector.
(f) Set the steering pad assembly to the steering wheel assembly.
(g) Check that the airbag wire harness and horn wire harness are not pinched.
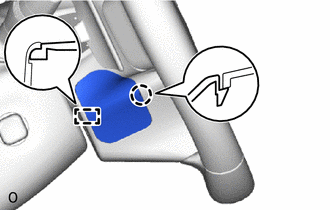
| (h) Press the steering pad assembly with both hands to attach the 2 upper pins to the torsion springs. |
|

(i) Press the steering pad assembly with both hands to attach the lower pin to the torsion spring.
NOTICE:
After installation, try to pull the steering pad assembly and check that the steering pad assembly is securely installed.
2. INSTALL LOWER NO. 2 STEERING WHEEL COVER
| (a) Attach the guide and claw to install the lower No. 2 steering wheel cover. |
|

3. INSTALL LOWER NO. 3 STEERING WHEEL COVER
| (a) Attach the guide and claw to install the lower No. 3 steering wheel cover. |
|
4. CONNECT CABLE TO NEGATIVE AUXILIARY BATTERY TERMINAL
(a) Connect the cable to the negative (-) auxiliary battery terminal and tighten the nut.
Torque:
5.4 N·m {55 kgf·cm, 48 in·lbf}
5. INITIALIZATION AFTER RECONNECTING AUXILIARY BATTERY TERMINAL
Click here .gif)
HINT:
When disconnecting and reconnecting the auxiliary battery, there is an automatic learning function that completes learning when the respective system is used.
Click here
6. INSTALL DECK FLOOR BOX LH
Click here
7. INSTALL REAR DECK FLOOR BOX
Click here
8. INSTALL NO. 3 DECK BOARD SUB-ASSEMBLY
Click here
9. INSPECT STEERING PAD ASSEMBLY
(a) With the steering pad assembly installed to the vehicle, perform a visual check. If there are any defects as mentioned below, replace the steering pad assembly with a new one:
Cuts, minute cracks or marked discoloration on the steering pad assembly top surface or in the grooved portion.
(b) Make sure that the horn sounds.
HINT:
If the horn does not sound, inspect the horn system.
Click here
10. PERFORM DIAGNOSTIC SYSTEM CHECK
Click here
11. CHECK SRS WARNING LIGHT
Click here
READ NEXT:
 Disposal
DISPOSAL CAUTION / NOTICE / HINT CAUTION: Before performing pre-disposal deployment of any SRS part, review and closely follow all applicable environmental and hazardous material regulations. Pre-disp
Certification Ecu
ComponentsCOMPONENTS ILLUSTRATION *1 CERTIFICATION ECU (SMART KEY ECU ASSEMBLY) *2 ECU INTEGRATION BOX RH *3 GLOVE COMPARTMENT DOOR ASSEMBLY *4 NO. 2 INSTRUMENT PANEL UNDER COVER
SEE MORE:
Dtc Check / Clear
DTC CHECK / CLEAR CHECK DTC (USING THE Techstream) (a) Turn the power switch off. (b) Connect the Techstream to the DLC3. (c) Turn the power switch on (IG). (d) Turn the Techstream on. (e) Enter the following menus: Chassis / EMPS / Trouble Codes. Chassis > EMPS > Trouble Codes (f) Read the DT
Diagnosis System
DIAGNOSIS SYSTEM CHECK FOR INSTALLED SYSTEMS (ECUS AND SENSORS) THAT USE CAN COMMUNICATION (a) The systems (ECUs and sensors) that use CAN communication vary depending on the vehicle and optional equipment. Check which systems (ECUs and sensors) are installed to the vehicle. Connected to Code
