
Lexus NX: On-vehicle Inspection
ON-VEHICLE INSPECTION
PROCEDURE
1. INSPECT GARAGE DOOR OPENER
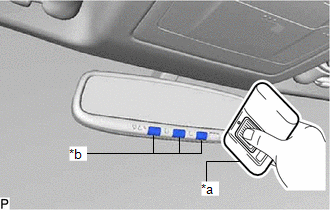
| (a) Press each switch and check that the red LED turns on. If one or more of the switches does not turn on the LED, check the condition of the fuse and wire harness. If the fuse and wire harness are malfunctioning, repair or replace them. If not, replace the inner rear view mirror assembly (garage door opener). Click here |
|
.gif)
.png)
2. INSPECT GARAGE DOOR OPENER REGISTRATION AND TRANSMITTING
HINT:
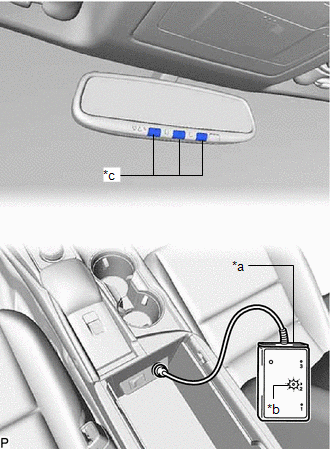
Use the "HomeLink" tester and a tester transmitter for this test. First clear the customer transmitter codes, and then register the tester transmitter code.
| (a) Check if the tester transmitter code was successfully registered. HINT:
|
|
| (b) Press a garage door opener ("HomeLink") switch. Check if the green LED of the "HomeLink" tester illuminates. HINT: If the green LED does not illuminate, replace the inner rear view mirror assembly (garage door opener). Click here |
|
(c) When the inspection is complete, register the customer transmitter code(s) again.
HINT:
- Registration of the customer transmitter code(s) may not be possible in the service facility if the customer's transmitters are not available or if any of the buttons are used for rolling code-type systems.
- Refer to the Owner's Manual for additional information about registration (programming) of transmitter codes.
READ NEXT:
 Components
COMPONENTS ILLUSTRATION *A w/ Power Back Door *B w/o Power Back Door *1 BACK DOOR FINISH COVER LH *2 BACK DOOR FINISH COVER RH *3 BACK DOOR LOCK COVER *4 BACK DOOR SIDE G
SEE MORE:
Repair
REPAIR PROCEDURE 1. REPAIR INTAKE VALVE SEAT NOTICE:
Repair the seat while checking the seating position.
Keep the lip free of foreign matter.
Take off the cutter gradually to make the intake valve seat smooth.
(a) Using a 45° cutter, resurface the valve seat so that the valve seat wid
Drive Motor "B" Position Sensor Circuit Range / Performance (P0A46-126)
DTC SUMMARY MALFUNCTION DESCRIPTION This DTC indicates that an overvoltage in the inverter has occurred. The cause of this malfunction may be one of the following: Internal inverter malfunction
Inverter internal circuit malfunction
Rear traction motor with transaxle assembly malfunction
Ope
