Lexus NX: On-vehicle Inspection
ON-VEHICLE INSPECTION
CAUTION / NOTICE / HINT
NOTICE:
If using a dropper to adjust the fluid amount, make sure that the dropper has not been used with mineral oils, water or deteriorated brake fluid. Sealed areas may deteriorate and lead to fluid leaks, or the fluid may deteriorate and lead to decreased efficiency.
HINT:
If the brake fluid level is below the MIN line, inspect for brake fluid leaks and brake pad wear. After repair or replacement, adjust the brake fluid level in the reservoir as specified below.
PROCEDURE
1. INSPECT AND ADJUST FLUID LEVEL IN RESERVOIR (When Using the Techstream)
(a) Connect the Techstream to the DLC3 with the power switch off.
(b) Check that park (P) is selected and the parking brake is applied, and turn the power switch on (IG).
(c) Turn the Techstream on and enter the following menus: Chassis / ABS/VSC/TRAC / Utility / ECB (Electronically Controlled Brake system) Utility / Zero Down.
Chassis > ABS/VSC/TRAC > Utility| Tester Display |
|---|
| ECB Utility |
(d) Select "Next" and wait for 10 seconds.
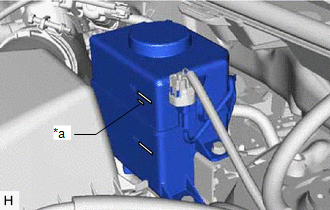
| (e) After the booster pump stops, check that the fluid level is between the MAX and MIN lines. If necessary, refill the brake fluid to the MAX line. Brake fluid: SAE J1703 or FMVSS No. 116 DOT 3 |
|

2. INSPECT AND ADJUST FLUID LEVEL IN RESERVOIR (When not Using the Techstream)
| (a) Check that the fluid level is above the MIN line with the power switch on (IG). If necessary, refill the brake fluid to the fluid level support line with the power switch on (IG). |
|
READ NEXT:
 Replacement
REPLACEMENT CAUTION / NOTICE / HINT HINT: There are 2 methods for brake fluid replacement: using the Techstream or not using the Techstream. NOTICE:
Perform fluid replacement with park (P) selected
Bleeding
BLEEDING CAUTION / NOTICE / HINT CAUTION: The Techstream must be used for air bleeding. If not used, the air bleeding will be incomplete, which is hazardous and may lead to an accident. NOTICE:
Per
Brake Line
PrecautionPRECAUTION NOTICE:
Since the brake lines are classified as critical safety related parts, be sure to disassemble and inspect the components if any brake fluid leaks are found. If any abn
SEE MORE:
How To Proceed With Troubleshooting
CAUTION / NOTICE / HINT PRECAUTIONS WHEN TROUBLESHOOTING NOTICE:
Because the order of diagnosis is important to allow correct diagnosis, make sure to begin troubleshooting using How to Proceed with Troubleshooting when CAN communication system related DTCs are output.
If the CAN communication s
Customize Parameters
CUSTOMIZE PARAMETERS CUSTOMIZE TELEMATICS SYSTEM (a) Customizing with the Techstream. NOTICE:
When the customer requests a change in a function, first make sure that the function can be customized.
Be sure to make a note of the current settings before customizing.
When troubleshooting a funct
