Lexus NX: Operation Check
OPERATION CHECK
CHECK POWER SEAT FUNCTION
(a) Check the basic functions.
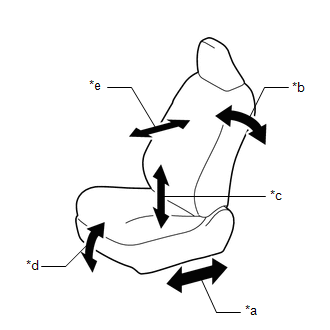
| *a | Slide Function |
| *b | Reclining Function |
| *c | Rear Lifter Function |
| *d | Front Vertical Function |
| *e | Lumbar Support Adjustment Function |
(1) Operate the power seat switches and check that the following seat functions operate properly:
- Slide function
- Reclining function
- Rear lifter function
- Front vertical function
- Lumbar support adjustment function
CHECK POWER SEAT MOTOR (SLIDING, FRONT VERTICAL, REAR LIFTER AND RECLINING FUNCTIONS)
(a) Check the PTC operation inside the power seat motor.
NOTICE:
- The inspection should be performed with the seat installed in the vehicle.
- Perform the 4 steps below to check the full range of motion for each power seat function.
HINT:
The resistance of the PTC thermistor increases when a switch of the front power seat switch LH is held down even after the seat has been moved to the farthest possible position in one direction. If the resistance increases beyond a specified level, the current is shut off to prevent a short circuit.
(1) Choose a power seat function. Operate a switch of the front power seat switch LH and move the seat to the farthest possible position in one direction. Keep the seat in that position for approximately 60 seconds.
(2) Operate the switch of the front power seat switch LH again and continue to try to move the seat in the same direction as in the previous step. Measure the time until the current is shut off (motor operation sound will stop).
Standard:
4 to 90 seconds
(3) After the current is shut off, release the switch of the front power seat switch LH and wait for approximately 60 seconds.
(4) Operate the same switch of the front power seat switch LH and move the seat in the opposite direction. Check that the motor operates.
CHECK LUMBAR SUPPORT ADJUSTMENT MOTOR
(a) Check the PTC operation inside the lumbar support adjustment motor.
NOTICE:
The inspection should be performed with the seat installed in the vehicle.
(1) Operate the front lumbar power seat switch and move the lumbar support to either the foremost or rearmost position. Keep the seat in that position for approximately 60 seconds.
(2) Operate the front lumbar power seat switch again and continue to try to move the lumbar support in the same direction as in the previous step. Measure the time until the current is shut off (motor operation sound will stop).
Standard:
4 to 90 seconds
(3) After the current is shut off, release the front lumbar power seat switch and wait for approximately 60 seconds.
(4) Operate the front lumbar power seat switch and move the lumbar support in the opposite direction. Check that the motor operates.
CHECK POWER SEAT POWER EASY ACCESS SYSTEM
HINT:
When troubleshooting a function, first make sure that the function is set to the default setting.
Click here .gif)
(a) Check that the seat slides backward when either of the following conditions is met:
- The driver seat belt is unfastened with the power switch off and the shift lever in P.
- The power switch is turned from on (IG) or on (ACC) to off with the shift lever in P or N and the driver seat belt unfastened.
(b) Check that the seat slides forward when either of the following conditions is met:
- The driver seat belt is fastened with the power switch on (IG) or on (ACC) and the shift lever in P or N.
- The power switch is turned from off to on (IG) or on (ACC) with the shift lever in P or N and the driver seat belt unfastened.
CHECK SEAT POSITION MEMORY AND RESTORING FUNCTION
HINT:
- The SET, M1, M2 and M3 seat memory switches are shown in the illustration.
-
The seat position will not be stored if the SET switch and 2 or more of the seat memory switches (for example, M1 switch and M2 switch) are pressed simultaneously.
If a memorizing operation has failed, release all switches. The seat memory function does not operate unless the switches are released.
-
The seat will not return to the memorized position if 2 or more of the seat memory switches (for example, M1 switch and M2 switch) are pressed simultaneously.
If a restoring operation has failed, release all switches. The seat memory restoring function does not operate unless the switches are released.
(a) Turn the power switch on (IG) and check that the P position indicator is on.
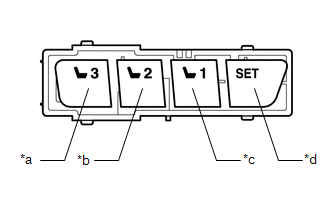
| *a | M3 Switch |
| *b | M2 Switch |
| *c | M1 Switch |
| *d | SET Switch |
(b) Move the seat to the foremost and uppermost positions using the front power seat switch LH.
(c) Check that the buzzer sounds for 0.5 seconds and the seat position is memorized when the M1 switch is pressed within 3 seconds of the SET switch being pressed or the M1 switch is pressed while the SET switch is being pressed.
(d) Move the seat out of the foremost and uppermost positions using the front power seat switch LH.
(e) Check that the buzzer sounds for 0.5 seconds and the seat position is memorized when the M2 switch is pressed within 3 seconds of the SET switch being pressed or the M2 switch is pressed while the SET switch is being pressed.
(f) Move the seat to the rearmost and lowermost positions using the front power seat switch LH.
(g) Check that the buzzer sounds for 0.5 seconds and the seat position is memorized when the M3 switch is pressed within 3 seconds of the SET switch being pressed or the M3 switch is pressed while the SET switch is being pressed.
(h) Check that the buzzer sounds for 0.1 seconds and the seat automatically moves into the foremost and uppermost positions (memorized positions) when the M1 switch is pressed.
(i) Check that the buzzer sounds for 0.1 seconds and the seat automatically moves out of the foremost and uppermost positions (memorized positions) when the M2 switch is pressed.
(j) Check that the buzzer sounds for 0.1 seconds and the seat automatically moves into the rearmost and lowermost positions (memorized positions) when the M3 switch is pressed.
(k) Turn the power switch off and open the driver door. Check that the buzzer sounds for 0.1 seconds and the seat automatically moves to the memorized position by pressing the M1, M2 or M3 switch within 180 seconds after the power switch is turned off.
(l) Turn the power switch off and close the driver door. Check that the buzzer sounds for 0.1 seconds and the seat automatically moves to the memorized position by pressing the M1, M2 or M3 switch within 60 seconds after the power switch is turned off.
(m) Operate the front vertical function of the front power seat switch LH to tilt the seat down 3 times.
Within 10 seconds after operating the front vertical function of the front power seat switch LH, operate the lifter function of the front power seat switch LH to tilt up and the reclining function of the front power seat switch LH to recline the seat simultaneously. Hold both switches for 10 seconds.
HINT:
The buzzer sounds for 0.5 seconds when the memory is cleared.
CHECK MEMORY CALL FUNCTION
(a) Memory registration
NOTICE:
- Do not bring 2 or more electrical key transmitter sub-assemblies into the cabin.
- Do not press and hold the door control switch on the multiplex network master switch assembly for 3 seconds or more.
(1) Register the seat position to a seat memory switch (M1, M2, or M3 switch) in advance.
(2) Sit on the driver seat carrying only the electrical key transmitter sub-assembly to be registered to the vehicle.
(3) With the power switch on (IG) and the shift lever in P, restore the memorized position to be registered.
(4) With the power switch on (IG), the shift lever in P, the driver door closed, and a seat memory switch (M1, M2, or M3 switch) being pressed and held, press and hold the door control switch on the multiplex network master switch assembly until the buzzer answer-back function operates.
HINT:
- The door control switch on the multiplex network master switch assembly can be pressed to either the lock or unlock side.
- The buzzer sounds for 0.5 seconds when the registration is complete.
- The buzzer sounds for 3 seconds when the registration fails.
(b) Automatic memory call function
(1) With the identification code of the electrical key transmitter sub-assembly registered and the entry unlock function operated or wireless door unlock operation performed, check that the buzzer sounds for 0.1 seconds and the seat automatically moves to the memorized position when the driver door is opened.
HINT:
When the customize function "Seat Move Distance" is set to "Standard", the seat slides backward to a position 50 mm (1.97 in.) from the memorized position.
Click here
(c) Memory deletion
NOTICE:
- Do not bring 2 or more electrical key transmitter sub-assemblies into the cabin.
- Do not press and hold the door control switch on the multiplex network master switch assembly for 3 seconds or more.
(1) Sit on the driver seat carrying only the electrical key transmitter sub-assembly to be deleted from the vehicle.
(2) With the power switch on (IG), the shift lever in P, the driver door closed, and the SET seat memory switch being pressed and held, press and hold the door control switch on the multiplex network master switch assembly until the answerback by the buzzer is confirmed.
HINT:
- The door control switch on the multiplex network master switch assembly can be pressed to either the lock or unlock side.
- The buzzer sounds for 0.5 seconds when the registration is complete.
- The buzzer sounds for 3 seconds when the registration fails.
MEMORY CALL EMERGENCY STOP FUNCTION
(a) While a memory call function is operating, check that performing one of the following will stop the memory call operation: 1) press the SET switch, M1 switch, M2 switch or M3 switch or 2) press the front power seat switch LH.
READ NEXT:
 Customize Parameters
CUSTOMIZE PARAMETERS CUSTOMIZE FRONT POWER SEAT CONTROL SYSTEM (w/ Memory) HINT: The following items can be customized. NOTICE:
When the customer requests a change in a function, first make sure th
Problem Symptoms Table
PROBLEM SYMPTOMS TABLE HINT:
Use the table below to help determine the cause of problem symptoms. If multiple suspected areas are listed, the potential causes of the symptoms are listed in order of
Terminals Of Ecu
TERMINALS OF ECU CHECK FRONT POWER SEAT SWITCH LH (a) Disconnect the g11 and g12 front power seat switch LH connectors. (b) Measure the voltage and resistance according to the value(s) in the table b
SEE MORE:
Precaution
PRECAUTION PRECAUTION FOR DISCONNECTING CABLE FROM NEGATIVE AUXILIARY BATTERY TERMINAL NOTICE: After the power switch is turned off, the radio receiver assembly records various types of memory and settings. As a result, after turning the power switch off, be sure to wait for the time specified in th
Customize Parameters
CUSTOMIZE PARAMETERS CUSTOMIZE TELEMATICS SYSTEM (a) Customizing with the Techstream. NOTICE:
When the customer requests a change in a function, first make sure that the function can be customized.
Be sure to make a note of the current settings before customizing.
When troubleshooting a funct
