
Lexus NX: Parts Location
PARTS LOCATION
ILLUSTRATION
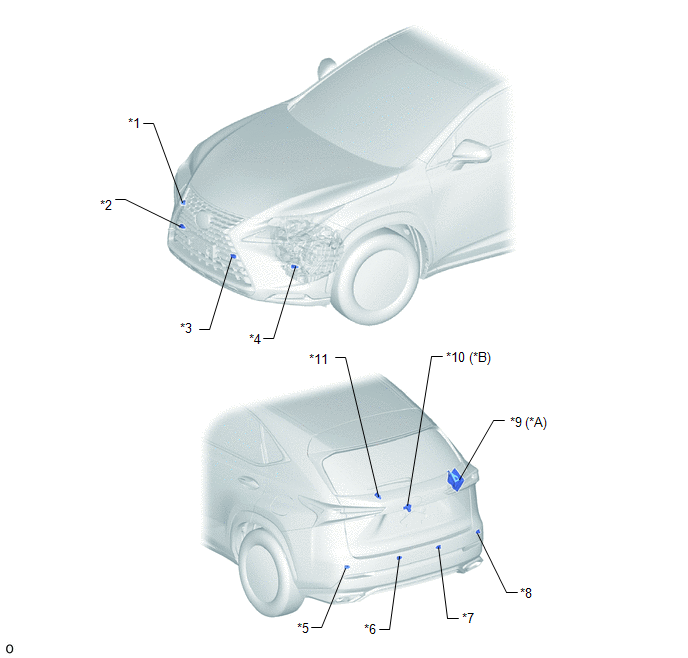
| *A | w/ Panoramic View Monitor System | *B | w/ Parking Assist Monitor System |
| *1 | FRONT CORNER ULTRASONIC SENSOR (FR SENSOR) | *2 | FRONT CENTER ULTRASONIC SENSOR (FRC SENSOR) |
| *3 | FRONT CENTER ULTRASONIC SENSOR (FLC SENSOR) | *4 | FRONT CORNER ULTRASONIC SENSOR (FL SENSOR) |
| *5 | REAR CORNER ULTRASONIC SENSOR (RL SENSOR) | *6 | REAR CENTER ULTRASONIC SENSOR (RLC SENSOR) |
| *7 | REAR CENTER ULTRASONIC SENSOR (RRC SENSOR) | *8 | REAR CORNER ULTRASONIC SENSOR (RR SENSOR) |
| *9 | PARKING ASSIST ECU | *10 | REAR TELEVISION CAMERA ASSEMBLY |
| *11 | NO. 2 CLEARANCE WARNING BUZZER | - | - |
ILLUSTRATION
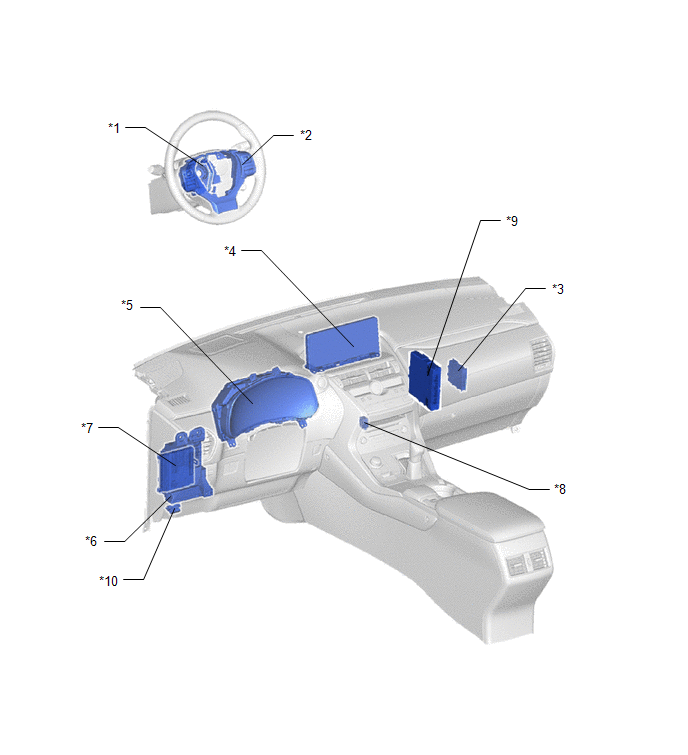
| *1 | SPIRAL CABLE SUB-ASSEMBLY | *2 | STEERING PAD SWITCH ASSEMBLY |
| *3 | CLEARANCE WARNING ECU ASSEMBLY | *4 | MULTI-DISPLAY ASSEMBLY |
| *5 | COMBINATION METER ASSEMBLY | *6 | INSTRUMENT PANEL JUNCTION BLOCK ASSEMBLY - ECU-IG NO.2 FUSE |
| *7 | MAIN BODY ECU (MULTIPLEX NETWORK BODY ECU) | *8 | NO. 1 CLEARANCE WARNING BUZZER |
| *9 | HYBRID VEHICLE CONTROL ECU | *10 | DLC3 |
READ NEXT:
 System Description
SYSTEM DESCRIPTION GENERAL (a) This system uses ultrasonic sensors to detect any obstacles at the corners and the rear of the vehicle. The system then informs the driver of the distance between the se
System Diagram
SYSTEM DIAGRAM Communication Table Sender Receiver Signal Line Main Body ECU (Multiplex Network Body ECU) Clearance Warning ECU Assembly Destination information signal CAN Commun
How To Proceed With Troubleshooting
CAUTION / NOTICE / HINT HINT:
Use the following procedure to troubleshoot the intuitive parking assist system.
*: Use the Techstream.
PROCEDURE 1. VEHICLE BROUGHT TO WORKSHOP
NE
SEE MORE:
Removal
REMOVAL PROCEDURE 1. REMOVE NO. 1 ENGINE UNDER COVER ASSEMBLY Click here 2. DISCONNECT TRANSMISSION CONTROL CABLE ASSEMBLY (a) Remove the nut and disconnect the transmission control cable assembly from the control shaft lever. (b) Remove the clip from the transmission control cabl
Park / Neutral Position Switch Circuit
DESCRIPTION The fold seat control ECU receives switch operation signals, back door open/close signal*1, rear door open/close signal*2 and driving condition signal (shift position, stop light switch assembly, parking brake switch assembly signals) from the main body ECU (multiplex network body ECU).
