Lexus NX: Removal
REMOVAL
CAUTION / NOTICE / HINT
HINT:
- Use the same procedure for the RH and LH sides.
- The procedure described below is for the LH side.
PROCEDURE
1. REMOVE FRONT BUMPER ASSEMBLY
Click here .gif)
2. REMOVE FOG LIGHT ASSEMBLY LH
| (a) Remove the 2 screws. |
|
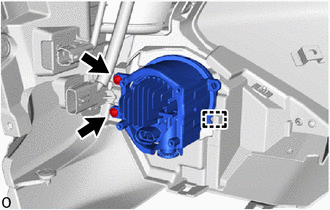
(b) Detach the guide and remove the fog light assembly LH.
READ NEXT:
 Inspection
INSPECTION PROCEDURE 1. INSPECT FOG LIGHT ASSEMBLY LH (a) Apply battery voltage to the connector and check the light illumination condition. OK: Condition Specified Condition Battery posi
Adjustment
ADJUSTMENT CAUTION / NOTICE / HINT HINT:
Use the same procedure for the RH and LH sides.
The procedure listed below is for the LH side.
It is possible that a fog light assembly is incorrectly i
Installation
INSTALLATION CAUTION / NOTICE / HINT HINT:
Use the same procedure for the RH and LH sides.
The procedure described below is for the LH side.
PROCEDURE 1. INSTALL FOG LIGHT ASSEMBLY LH (a) Atta
SEE MORE:
Headlight Cleaner Control Relay (for Single Beam Headlight)
ComponentsCOMPONENTS ILLUSTRATION *1 FRONT BUMPER COVER *2 HEADLIGHT CLEANER CONTROL RELAY On-vehicle InspectionON-VEHICLE INSPECTION PROCEDURE 1. INSPECT HEADLIGHT CLEANER CONTROL RELAY (a) Measure the resistance according to the value(s) in the table below. Standard Resistance:
Throttle / Pedal Position Sensor / Switch "D" Circuit (P2120-152,...,P2138-154)
DESCRIPTION The accelerator pedal position sensor is mounted on the accelerator pedal to detect how much the pedal is depressed. This is a non-contact sensor with Hall elements. There are 2 outputs from the sensor. One is used to detect the accelerator pedal position and the other is used as a confi
© 2016-2026 Copyright www.lexunx.com
