Lexus NX: Relay
On-vehicle Inspection
ON-VEHICLE INSPECTION
PROCEDURE
1. INSPECT HORN RELAY ASSEMBLY
| (a) Remove the horn relay assembly. |
|
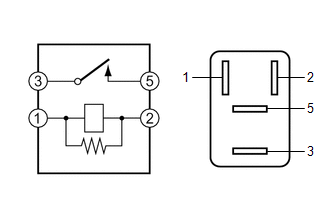
(b) Measure the resistance according to the value(s) in the table below.
Standard Resistance:
| Tester Connection | Condition | Specified Condition |
|---|---|---|
| 3 - 5 | Voltage is not applied between terminals 1 and 2 | 10 kΩ or higher |
| 3 - 5 | Voltage is applied between terminals 1 and 2 | Below 1 Ω |
If the result is not as specified, replace the horn relay assembly.
READ NEXT:
 Precaution
PRECAUTION PRECAUTION WHEN REPLACING HEADLIGHT ECU SUB-ASSEMBLY LH (a) If the headlight ECU sub-assembly LH has been replaced, it is necessary to synchronize the vehicle information and initialize the
SEE MORE:
Front Camera Internal Circuit (C2A60)
DESCRIPTION This DTC is stored when the parking assist ECU detects a signal indicating a malfunction in the front television camera assembly via CAN communication. DTC No. Detection Item DTC Detection Condition Trouble Area C2A60 Front Camera Internal Circuit A signal indicating a m
Millimeter Wave Radar Sensor Communication Stop Mode
DESCRIPTION Detection Item Symptom Trouble Area Millimeter Wave Radar Sensor Communication Stop Mode Any of the following conditions are met:
Communication stop for "Front Radar" is indicated on the "Communication Bus Check" screen of the Techstream.
Click here
Communication sy
© 2016-2026 Copyright www.lexunx.com
