Lexus NX: Removal
REMOVAL
PROCEDURE
1. REMOVE NO. 1 ENGINE UNDER COVER ASSEMBLY
Click here .gif)
2. DRAIN COOLANT (for Inverter Coolant)
Click here
3. REMOVE UPPER RADIATOR SUPPORT SUB-ASSEMBLY
Click here
4. DISCONNECT NO. 2 INVERTER COOLING HOSE ASSEMBLY
Click here
5. REMOVE WATER PUMP WITH MOTOR
| (a) Disconnect the water pump with motor connector from the water pump with motor. NOTICE: Wipe off any coolant from around both the connectors of the wire harness and water pump with motor before disconnecting them, and apply vinyl tape to the disconnected connectors to protect them from coolant. |
|
.png)
| (b) Slide the hose clamp, and disconnect the No. 2 inverter cooling hose and No. 3 inverter cooling hose from the water pump with motor. NOTICE: After disconnecting the water hose, plug the pipe with vinyl tape, etc. to prevent foreign matter from entering the water pump with motor. HINT: Prepare a drain pan or cloth in case the coolant leaks. |
|
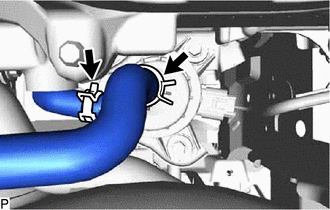
| (c) Remove the 3 bolts and the water pump with motor from the HV water pump bracket sub-assembly. |
|

6. REMOVE HV WATER PUMP BRACKET SUB-ASSEMBLY
| (a) Remove the 2 bolts and HV water pump bracket sub-assembly from the inverter bracket. |
|
.png)
READ NEXT:
 Installation
INSTALLATION PROCEDURE 1. INSTALL HV WATER PUMP BRACKET SUB-ASSEMBLY (a) Temporarily install the HV water pump bracket sub-assembly to the inverter bracket with bolt A. *a Bolt A
SEE MORE:
Terminals Of Ecu
TERMINALS OF ECU CHECK DCM (TELEMATICS TRANSCEIVER) Terminal No. (Symbol) Wiring Color Terminal Description Condition Specified Condition I183-1 (+B) - I183-20 (E) Y - W-B Power source (+B) Power switch off 11 to 14 V I183-3 (SIG-) - I183-20 (E) G - W-B Ground Alway
Installation
INSTALLATION PROCEDURE 1. INSTALL NO. 2 COOLING FAN MOTOR (a) Attach the 2 clamps and install the No. 2 cooling fan motor with the 3 screws. Torque: 3.9 N·m {40 kgf·cm, 35 in·lbf} (b) Install the cooling fan motor insulator to the fan shroud with the 2 screws. Torque: 2.6 N·m {27 kgf·cm, 23 i
