Lexus NX: Removal
REMOVAL
PROCEDURE
1. REMOVE CONSOLE ARMREST ASSEMBLY
Click here .gif)
2. REMOVE UPPER REAR CONSOLE PANEL
Click here
3. REMOVE UPPER NO. 2 CONSOLE PANEL GARNISH
Click here
4. REMOVE INSTRUMENT SIDE PANEL LH
Click here
5. REMOVE NO. 1 INSTRUMENT PANEL SAFETY PAD SUB-ASSEMBLY
Click here
6. REMOVE NO. 1 SWITCH HOLE BASE
Click here
7. REMOVE NO. 1 INSTRUMENT PANEL UNDER COVER SUB-ASSEMBLY
Click here
8. REMOVE LOWER NO. 1 INSTRUMENT PANEL FINISH PANEL
Click here
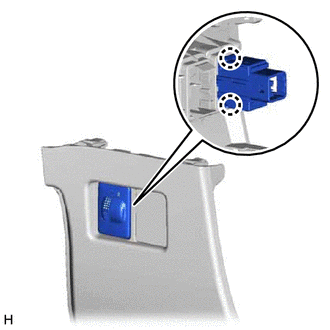
9. REMOVE VEHICLE SOUND SWITCH
| (a) Detach the 2 claws and remove the vehicle sound switch. |
|
READ NEXT:
 Inspection
INSPECTION PROCEDURE 1. INSPECT VEHICLE SOUND SWITCH (a) Check the vehicle sound switch on/off operation (1) Measure the resistance according to the value(s) in the table below. Standard Resistance
Installation
INSTALLATION PROCEDURE 1. INSTALL VEHICLE SOUND SWITCH (a) Attach the 2 claws to install the vehicle sound switch. 2. INSTALL LOWER NO. 1 INSTRUMENT PANEL FINISH PANEL Click here 3. INSTALL NO. 1
SEE MORE:
Components
COMPONENTS ILLUSTRATION *1 REAR COIL SPRING LH *2 REAR HEIGHT CONTROL SENSOR SUB-ASSEMBLY LH *3 REAR LOWER COIL SPRING INSULATOR LH *4 REAR NO. 2 SUSPENSION ARM ASSEMBLY LH *5 REAR STABILIZER LINK ASSEMBLY LH *6 REAR SUSPENSION ARM COVER LH *7 REAR UPPER COIL SPRI
Engine Coolant Temperature Circuit Range / Performance (P0116)
DESCRIPTION Refer to DTC P0115. Click here DTC No. Detection Item DTC Detection Condition Trouble Area MIL Memory P0116 Engine Coolant Temperature Circuit Range / Performance Either of the following conditions is met (2 trip detection logic):
When engine is started cold and
© 2016-2026 Copyright www.lexunx.com
