Lexus NX: Removal
REMOVAL
CAUTION / NOTICE / HINT
HINT:
- Use the same procedure for the RH and LH sides.
- The procedure listed below is for the LH side.
PROCEDURE
1. REMOVE REAR WHEEL
Click here .gif)
2. DISCONNECT REAR SPEED SENSOR LH
(a) w/o AVS:
Click here
(b) w/ AVS:
Click here
3. REMOVE REAR SUSPENSION ARM COVER LH
Click here
4. REMOVE REAR SHOCK ABSORBER ASSEMBLY LH
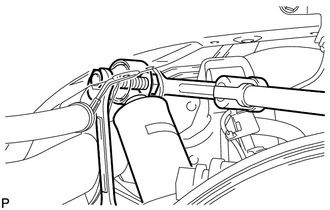
| (a) Support the rear No. 2 suspension arm with a jack using a wooden block to avoid damage. NOTICE: Do not excessively jack up the rear No. 2 suspension arm assembly LH. HINT: Support the rear shock absorber at a position where it compresses by approximately 20 to 30 mm (0.788 to 1.181 in.). |
|
.png)
| (b) Remove the 2 bolts and disconnect the rear shock absorber assembly LH with the rear No. 1 shock absorber bracket LH. |
|
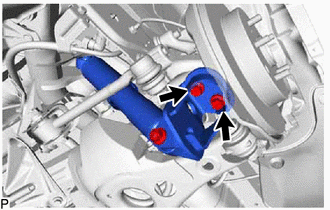
| (c) Using a 17 mm ball joint lock nut wrench, remove the bolt and nut on the upper side, and then remove the rear shock absorber assembly LH with rear No. 1 shock absorber bracket LH. |
|
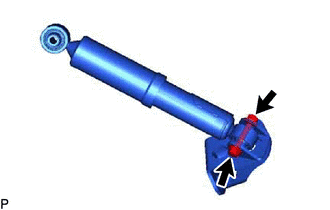
5. REMOVE REAR NO. 1 SHOCK ABSORBER BRACKET LH
| (a) Remove the nut and bolt from the rear No. 1 shock absorber bracket LH. |
|
READ NEXT:
 Inspection
INSPECTION PROCEDURE 1. INSPECT REAR SHOCK ABSORBER ASSEMBLY LH (a) Compress and extend the shock absorber rod and check that there is no abnormal resistance or unusual sound during operation. If ther
Installation
INSTALLATION CAUTION / NOTICE / HINT HINT:
Use the same procedure for the RH and LH sides.
The procedure listed below is for the LH side.
PROCEDURE 1. TEMPORARILY INSTALL REAR NO. 1 SHOCK ABSO
Disposal
DISPOSAL PROCEDURE 1. DISPOSE OF REAR SHOCK ABSORBER ASSEMBLY LH *A w/o AVS *B w/ AVS (a) Extend the piston rod and secure the rear shock absorber assembly at an angle in a vise. (b) Us
SEE MORE:
Electric Parking Brake AUTO Indicator Light Circuit
WIRING DIAGRAM CAUTION / NOTICE / HINT NOTICE:
Inspect the fuses for circuits related to this system before performing the following inspection procedure.
Before disconnecting connectors or fuses, turn the power switch off and wait 20 seconds or more.
When replacing the parking brake ECU ass
Replacement
REPLACEMENT CAUTION / NOTICE / HINT CAUTION:
Prolonged and repeated contact with engine oil will result in the removal of natural oils from the skin, leading to dryness, irritation and dermatitis. In addition, used engine oil contains potentially harmful contaminants which may cause skin cancer.
