Lexus NX: Removal
REMOVAL
PROCEDURE
1. REMOVE BACK DOOR CENTER GARNISH
Click here .gif)
2. REMOVE BACK DOOR SIDE GARNISH LH
Click here
3. REMOVE BACK DOOR SIDE GARNISH RH
Click here
4. REMOVE BACK DOOR TRIM BASE
Click here
5. REMOVE PULL HANDLE
Click here
6. REMOVE BACK DOOR LOCK COVER
Click here
7. REMOVE BACK DOOR TRIM BOARD ASSEMBLY
Click here
8. REMOVE POWER BACK DOOR WARNING BUZZER
| (a) Disconnect the connector. |
|
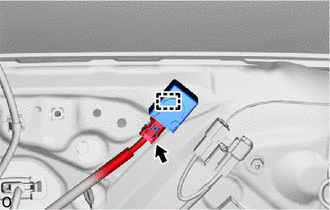
(b) Using a clip remover, detach the clamp and remove the power back door warning buzzer.
READ NEXT:
 Installation
INSTALLATION PROCEDURE 1. INSTALL POWER BACK DOOR WARNING BUZZER (a) Attach the clamp to install the power back door warning buzzer. (b) Connect the connector. 2. INSTALL BACK DOOR TRIM BOARD ASSEMBLY
Components
COMPONENTS ILLUSTRATION *1 DECK FLOOR BOX LH *2 NO. 3 DECK BOARD SUB-ASSEMBLY *3 REAR DECK FLOOR BOX *4 NEGATIVE AUXILIARY BATTERY TERMINAL N*m (kgf*cm, ft.*lbf): Specified
SEE MORE:
Test Mode Procedure
TEST MODE PROCEDURE TEST MODE PROCEDURE NOTICE:
After replacing the absorber control ECU, it is necessary to perform registration of vehicle identification information. Vehicle identification information is automatically acquired when the system enters test mode.
When vehicle identification inf
Components
COMPONENTS ILLUSTRATION *1 ELECTRICAL KEY ANTENNA *2 QUARTER OUTSIDE MOULDING SUB-ASSEMBLY LH *3 QUARTER OUTSIDE MOULDING SUB-ASSEMBLY RH *4 REAR BUMPER COVER *5 REAR FLOOR SIDE MEMBER COVER - - N*m (kgf*cm, ft.*lbf): Specified torque - -
© 2016-2026 Copyright www.lexunx.com
