Lexus NX: Components
COMPONENTS
ILLUSTRATION
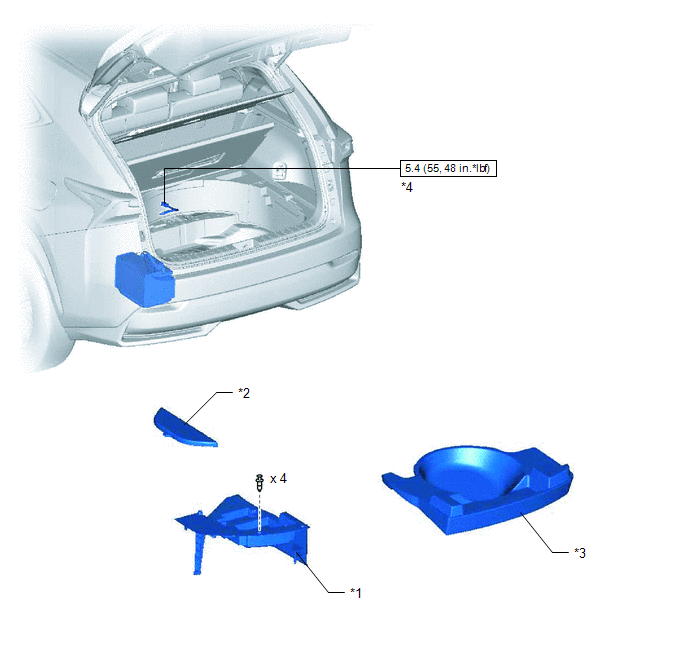
| *1 | DECK FLOOR BOX LH | *2 | NO. 3 DECK BOARD SUB-ASSEMBLY |
| *3 | REAR DECK FLOOR BOX | *4 | NEGATIVE AUXILIARY BATTERY TERMINAL |
.png) | N*m (kgf*cm, ft.*lbf): Specified torque | - | - |
ILLUSTRATION
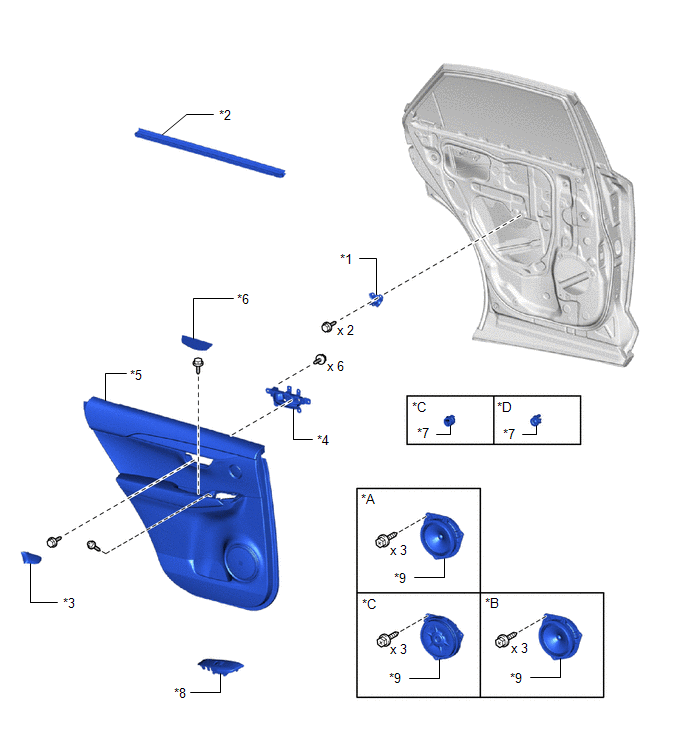
| *A | for 8 Speakers | *B | for 10 Speakers |
| *C | for 14 Speakers | *D | except 14 Speakers |
| *1 | REAR DOOR ARMREST SET BRACKET LH | *2 | REAR DOOR INNER GLASS WEATHERSTRIP LH |
| *3 | REAR DOOR INSIDE HANDLE BEZEL PLUG LH | *4 | REAR DOOR INSIDE HANDLE SUB-ASSEMBLY LH |
| *5 | REAR DOOR TRIM BOARD SUB-ASSEMBLY LH | *6 | REAR DOOR TRIM COVER LH |
| *7 | REAR NO. 2 SPEAKER ASSEMBLY | *8 | REAR POWER WINDOW REGULATOR SWITCH ASSEMBLY WITH REAR DOOR ARMREST BASE PANEL |
| *9 | REAR SPEAKER ASSEMBLY | - | - |
ILLUSTRATION

| *1 | REAR DOOR GLASS RUN LH | *2 | REAR DOOR GLASS SUB-ASSEMBLY LH |
| *3 | REAR DOOR LOCK CHILD PROTECTION COVER | *4 | REAR DOOR REAR GUIDE SEAL LH |
| *5 | REAR DOOR REAR LOWER WINDOW FRAME SUB-ASSEMBLY LH | *6 | REAR DOOR SERVICE HOLE COVER LH |
| *7 | REAR DOOR STIFFENER CUSHION LH | *8 | REAR DOOR WINDOW REGULATOR SUB-ASSEMBLY LH |
| *9 | BUTYL TAPE | - | - |
| | N*m (kgf*cm, ft.*lbf): Specified torque | ● | Non-reusable part |
.png) | MP grease | - | - |
ILLUSTRATION
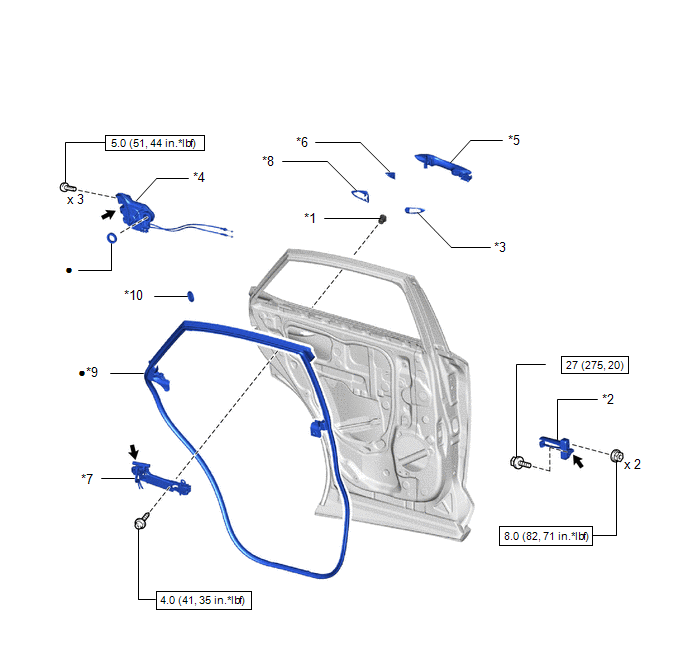
| *1 | DOOR OUTSIDE HANDLE BUSH | *2 | REAR DOOR CHECK ASSEMBLY LH |
| *3 | REAR DOOR FRONT OUTSIDE HANDLE PAD | *4 | REAR DOOR LOCK ASSEMBLY LH |
| *5 | REAR DOOR OUTSIDE HANDLE ASSEMBLY LH | *6 | REAR DOOR OUTSIDE HANDLE COVER LH |
| *7 | REAR DOOR OUTSIDE HANDLE FRAME SUB-ASSEMBLY LH | *8 | REAR DOOR REAR OUTSIDE HANDLE PAD |
| *9 | REAR DOOR WEATHERSTRIP LH | *10 | HOLE PLUG |
| | N*m (kgf*cm, ft.*lbf): Specified torque | ★ | Precoated part |
| ● | Non-reusable part | | MP grease |
ILLUSTRATION
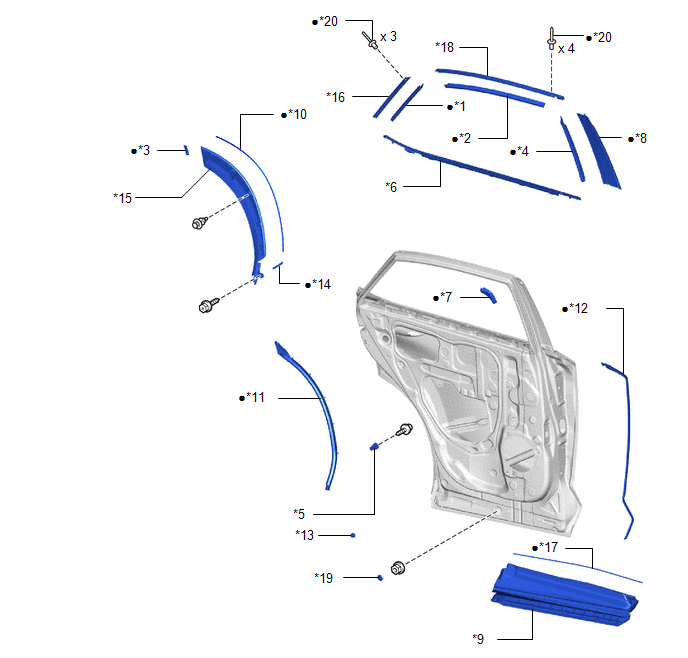
| *1 | NO. 1 BLACK OUT TAPE LH | *2 | NO. 2 BLACK OUT TAPE LH |
| *3 | NO. 2 MOULDING TAPE | *4 | NO. 3 BLACK OUT TAPE LH |
| *5 | OUTSIDE MOULDING RETAINER | *6 | REAR DOOR BELT MOULDING ASSEMBLY LH |
| *7 | REAR DOOR FRAME GARNISH LH | *8 | REAR DOOR FRONT WINDOW FRAME MOULDING LH |
| *9 | REAR DOOR LOWER OUTSIDE MOULDING SUB-ASSEMBLY LH | *10 | REAR DOOR NO. 1 MOULDING PAD |
| *11 | REAR DOOR NO. 2 WEATHERSTRIP LH | *12 | REAR DOOR NO. 3 WEATHERSTRIP LH |
| *13 | REAR DOOR PANEL CUSHION | *14 | REAR DOOR REAR OUTSIDE MOULDING PAD |
| *15 | REAR DOOR REAR UPPER OUTSIDE MOULDING LH | *16 | REAR DOOR REAR WINDOW FRAME MOULDING LH |
| *17 | REAR DOOR UPPER OUTSIDE MOULDING PAD | *18 | REAR DOOR UPPER WINDOW FRAME MOULDING LH |
| *19 | HOLE PLUG | *20 | RIVET |
| ● | Non-reusable part | - | - |
READ NEXT:
 Disassembly
DISASSEMBLY CAUTION / NOTICE / HINT HINT:
Use the same procedure for the RH and LH side.
The procedure listed below is for the LH side.
PROCEDURE 1. PRECAUTION NOTICE: After turning the power
Inspection
INSPECTION PROCEDURE 1. INSPECT REAR DOOR OUTSIDE HANDLE ASSEMBLY LH (a) Check that the LED illuminates. (1) Apply 6.0 V (4 dry cell batteries in series) to each terminal and check the illumination
Adjustment
ADJUSTMENT CAUTION / NOTICE / HINT HINT:
Use the same procedure for the RH and LH sides.
The procedure listed below is for the LH side.
Centering bolts are used to mount the door hinge to the v
SEE MORE:
Back Door Courtesy Switch Circuit
DESCRIPTION The fold seat control ECU receives the switch operation signal, driving condition signal and back door open/close signal from the back door lock assembly. The fold seat control ECU actives the rear seat according to these signals. WIRING DIAGRAM PROCEDURE 1. CHECK BACK DOOR LOCK A
System Diagram
SYSTEM DIAGRAM Transmitting ECU (Transmitter) Receiving ECU (Receiver) Signal Communication Method Airbag ECU Assembly Hybrid Vehicle Control ECU Crash detection signal CAN Combination Meter Assembly
SRS warning light on demand signal
SRS warning light blink demand s
