Lexus NX: Removal
REMOVAL
CAUTION / NOTICE / HINT
HINT:
- Use the same procedure for the RH and LH sides.
- The procedure listed below is for the LH side.
PROCEDURE
1. REMOVE FRONT DOOR OPENING TRIM WEATHERSTRIP LH
Click here .gif)
2. REMOVE FRONT PILLAR GARNISH ASSEMBLY LH
Click here
3. REMOVE NO. 1 INSTRUMENT PANEL SPEAKER PANEL SUB-ASSEMBLY
Click here
4. REMOVE FRONT NO. 2 SPEAKER ASSEMBLY
NOTICE:
Do not touch the cone part of the speaker.
| (a) Remove the 2 screws. |
|
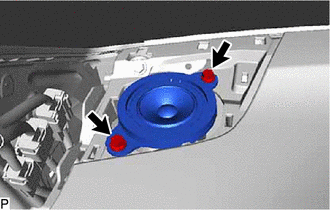
(b) Disconnect the connector and remove the front No. 2 speaker assembly.
5. REMOVE NO. 1 SPEAKER OPENING COVER ASSEMBLY
Click here
6. REMOVE FRONT NO. 3 SPEAKER ASSEMBLY
NOTICE:
Do not touch the cone part of the speaker.
| (a) Remove the 2 screws. |
|
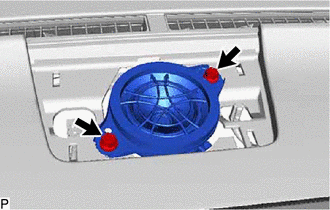
(b) Disconnect the connector and remove the front No. 3 speaker assembly.
READ NEXT:
 Inspection
INSPECTION PROCEDURE 1. INSPECT FRONT NO. 2 SPEAKER ASSEMBLY (a) Measure the resistance according to the value(s) in the table below. Standard Resistance: for 8 Speakers Tester Connection Con
Installation
INSTALLATION CAUTION / NOTICE / HINT HINT:
Use the same procedure for the RH and LH sides.
The procedure listed below is for the LH side.
PROCEDURE 1. INSTALL FRONT NO. 3 SPEAKER ASSEMBLY NOTI
SEE MORE:
Wireless Transmitter Memory Function does not Operate
DESCRIPTION With the power switch on (IG) and the driver door closed, pressing the manual lock or unlock switch on the multiplex network master switch assembly while holding a seat memory switch (M1, M2 or M3 switch) will register the transmitter recognition code into the seat memory switch that was
AV Signal Stoppage (Low Battery Voltage) (B158F)
DESCRIPTION This DTC is stored when a video or audio signal is interrupted due to auxiliary battery voltage input to the radio receiver assembly dropping temporarily. DTC No. Detection Item DTC Detection Condition Trouble Area B158F AV Signal Stoppage (Low Battery Voltage) A video o
© 2016-2026 Copyright www.lexunx.com
