Lexus NX: Removal
REMOVAL
PROCEDURE
1. REMOVE CONSOLE BOX ASSEMBLY
Click here .gif)
2. REMOVE DOOR SCUFF PLATE ASSEMBLY LH
Click here
3. REMOVE COWL SIDE TRIM BOARD LH
Click here
4. DISCONNECT FRONT FLOOR CARPET ASSEMBLY
| (a) Using a clip remover, remove the clip. |
|
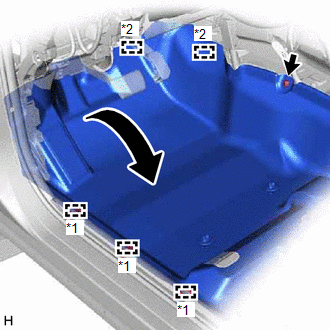
(b) Detach the 3 hooks and 2 fasteners and fold back part of the front floor carpet assembly.
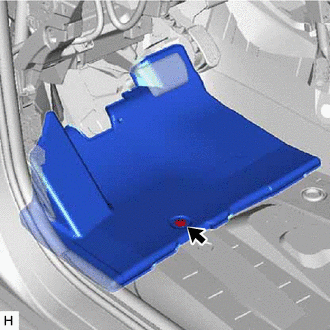
5. REMOVE NO. 4 DASH PANEL INSULATOR PAD (FRONT FLOOR FOOTREST)
| (a) Using a clip remover, remove the clip and No. 4 dash panel insulator pad (front floor footrest). |
|
READ NEXT:
 Installation
INSTALLATION PROCEDURE 1. INSTALL NO. 4 DASH PANEL INSULATOR PAD (FRONT FLOOR FOOTREST) (a) Install the No. 4 dash panel insulator pad (front floor footrest) with the clip. 2. CONNECT FRONT FLOOR CARP
Precaution
PRECAUTION PRECAUTION FOR VEHICLE WITH AIRBAG (a) Some operations in this section may affect the airbag. Prior to performing the corresponding operations, read the SRS Precaution. Click here
SEE MORE:
Lost Communication with Brake System Control Module (U0129,U0293,U1104)
DESCRIPTION The power steering ECU assembly receives signals from the hybrid vehicle control ECU, skid control ECU(brake booster with master cylinder assembly) and forward recognition camera via the CAN communication system. DTC No. Detection Item DTC Detection Condition Trouble Area Warn
Rear Door RH Entry Unlock Function does not Operate
DESCRIPTION If the entry unlock function does not operate for the rear door RH only, but the entry lock function operates, the request code is being transmitted properly from the rear door RH. In this case, there may be a problem related to the unlock sensor (connection between the certification ECU
© 2016-2026 Copyright www.lexunx.com
