Lexus NX: Removal
REMOVAL
PROCEDURE
1. REMOVE NO. 1 SPEAKER WITH BOX ASSEMBLY (w/ ASC System)
Click here .gif)
2. REMOVE REAR CONSOLE BOX ASSEMBLY (w/o ASC System)
Click here
3. DISCONNECT TRANSMISSION CONTROL CABLE ASSEMBLY
Click here
4. REMOVE INVERTER WITH CONVERTER ASSEMBLY
Click here
5. REMOVE NO. 1 ENGINE UNDER COVER ASSEMBLY
Click here
6. REMOVE INVERTER WATER PUMP WITH MOTOR ASSEMBLY
Click here
7. REMOVE INVERTER BRACKET ASSEMBLY
Click here
8. REMOVE TRANSMISSION CONTROL CABLE ASSEMBLY
(a) Move the shift lever to N.
| (b) Disconnect the clamp and transmission control cable assembly from the No. 2 transmission control cable bracket. |
|
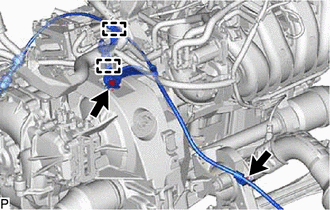
(c) Remove the 2 bolts, and disconnect the clamp and transmission control cable assembly.
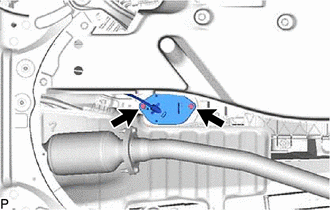
| (d) Remove the nut and disconnect the transmission control cable assembly from the control shaft lever. |
|
.png)
(e) Remove the clip from the transmission control cable assembly.
| (f) Remove the 2 bolts and transmission control cable assembly. |
|
READ NEXT:
 Adjustment
ADJUSTMENT PROCEDURE 1. INSPECT SHIFT LEVER POSITION (a) While moving the shift lever from N to each position, check that the lever moves smoothly and that the shift position indicator comes on proper
Installation
INSTALLATION PROCEDURE 1. INSTALL TRANSMISSION CONTROL CABLE ASSEMBLY NOTICE: Before installing the transmission control cable assembly, check that the shift lever position sensor and the shift lever
SEE MORE:
Precaution
PRECAUTION PRECAUTION FOR DISCONNECTING CABLE FROM NEGATIVE AUXILIARY BATTERY TERMINAL NOTICE:
When disconnecting the cable from the negative (-) auxiliary battery terminal, initialize the some systems after the cable is reconnected.
Click here
If the auxiliary battery has been discharged and
Freeze Frame Data
FREEZE FRAME DATA DESCRIPTION (a) Whenever a road sign assist system DTC is stored, the forward recognition camera stores the current vehicle state (ECU and sensor information) as freeze frame data. CHECK FREEZE FRAME DATA (a) Connect the Techstream to the DLC3. (b) Turn the power switch on (IG). (c
