Lexus NX: Vanity Light Bulb
Replacement
REPLACEMENT
CAUTION / NOTICE / HINT
HINT:
- Use the same procedure for the RH and LH sides.
- The procedure listed below is for the LH side.
PROCEDURE
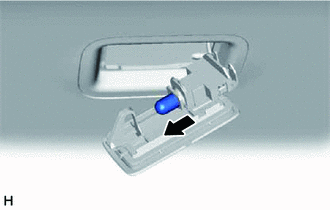
1. DISCONNECT VANITY LIGHT ASSEMBLY
| (a) Using a screwdriver, detach the claw and disconnect the vanity light assembly. HINT: Tape the screwdriver tip before use. |
|
.png)
2. REMOVE VANITY LIGHT BULB
| (a) Remove the vanity light bulb from the vanity light holder. |
|
3. INSTALL VANITY LIGHT BULB
| (a) Install the vanity light bulb to the vanity light holder. |
|
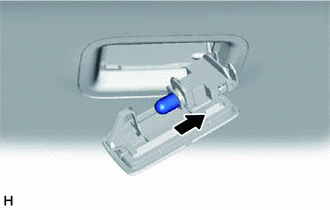
4. CONNECT VANITY LIGHT ASSEMBLY
| (a) Attach the claw to connect the vanity light assembly. |
|
.png)
READ NEXT:
 Components
COMPONENTS ILLUSTRATION *A for 8 Inch Display *B for 10.3 Inch Display *1 AIR CONDITIONING CONTROL ASSEMBLY *2 CENTER INSTRUMENT CLUSTER FINISH PANEL ASSEMBLY *3 CONSOLE ARMR
SEE MORE:
Removal
REMOVAL CAUTION / NOTICE / HINT NOTICE: While the auxiliary battery is connected, even if the power switch is off, the brake control system activates when the brake pedal is depressed or any door courtesy switch turns on. Therefore, when servicing the brake system components, do not operate the brak
Operation Check
OPERATION CHECK NOTICE WHEN CHECKING FOLLOWING (a) Wireless door lock/unlock function: This wireless door lock control function operates only when the following 3 conditions are met: (1) The power switch is off. (2) All doors are closed. (3) The power door lock control system is operating properly.
© 2016-2026 Copyright www.lexunx.com
