Lexus NX: Air Conditioning Amplifier
Components
COMPONENTS
ILLUSTRATION
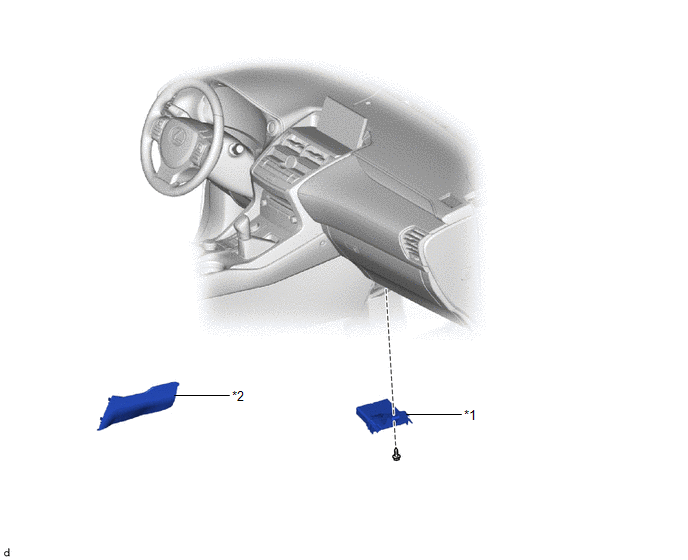
| *1 | AIR CONDITIONING AMPLIFIER ASSEMBLY | *2 | INNER NO. 1 INSTRUMENT PANEL BRACE COVER RH |
Removal
REMOVAL
PROCEDURE
1. REMOVE INNER NO. 1 INSTRUMENT PANEL BRACE COVER RH
Click here .gif)
2. REMOVE AIR CONDITIONING AMPLIFIER ASSEMBLY
| (a) Disconnect the 3 connectors. |
|
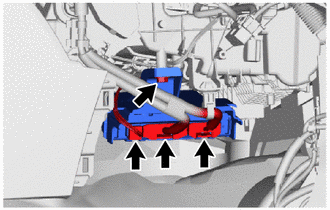
(b) Remove the screw.
(c) Remove the air conditioner amplifier assembly as shown in the illustration.
Installation
INSTALLATION
PROCEDURE
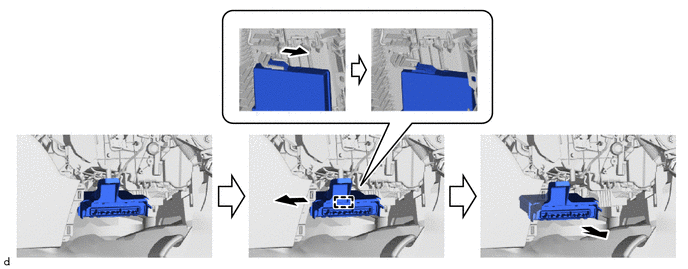
1. INSTALL AIR CONDITIONING AMPLIFIER ASSEMBLY
(a) Attach the guide to temporarily install the air conditioning amplifier assembly.
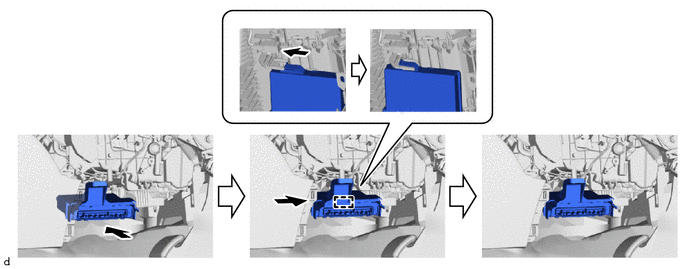
NOTICE:
Make sure to align the protrusion on the air conditioning amplifier assembly with the indentation on the air conditioning unit assembly.
(b) Install the screw.
(c) Connect the 3 connectors.
2. INSTALL INNER NO. 1 INSTRUMENT PANEL BRACE COVER RH
Click here .gif)
READ NEXT:
 Components
COMPONENTS ILLUSTRATION *1 AIR CONDITIONING CONTROL ASSEMBLY *2 CENTER INSTRUMENT CLUSTER FINISH PANEL ASSEMBLY *3 COWL SIDE TRIM BOARD LH *4 DOOR SCUFF PLATE ASSEMBLY LH *5
Removal
REMOVAL PROCEDURE 1. REMOVE MULTI-DISPLAY ASSEMBLY Click here 2. REMOVE DOOR SCUFF PLATE ASSEMBLY LH Click here 3. REMOVE COWL SIDE TRIM BOARD LH Click here 4. REMOVE REAR CONSOLE ARMREST ASS
SEE MORE:
Exhaust Gas Recirculation Flow Insufficient Detected (P0401)
DESCRIPTION Based on the driving conditions, the ECM regulates the volume of exhaust gas that is recirculated to the engine's combustion chambers and thus lowers the combustion temperature to reduce NOx emissions. The ECM monitors signals such as engine speed, engine coolant temperature, electric lo
Green Indicator Remains Off
DESCRIPTION After power switch on (IG), the DCM (telematics transceiver) will enter into self check mode. The manual (SOS) switch red indicator will illuminate for 2 seconds and turn off followed by the manual (SOS) switch green indicator illuminating and remaining on under normal operation. If neit
