Lexus NX: Components
Lexus NX Service Manual / Steering / Steering Column / Tilt And Telescopic Manual Switch / Components
COMPONENTS
ILLUSTRATION
.png)
| *1 | DECK FLOOR BOX LH | *2 | REAR DECK FLOOR BOX |
| *3 | NO. 3 DECK BOARD SUB-ASSEMBLY | *4 | NEGATIVE AUXILIARY BATTERY TERMINAL |
.png) | N*m (kgf*cm, ft.*lbf): Specified torque | - | - |
ILLUSTRATION
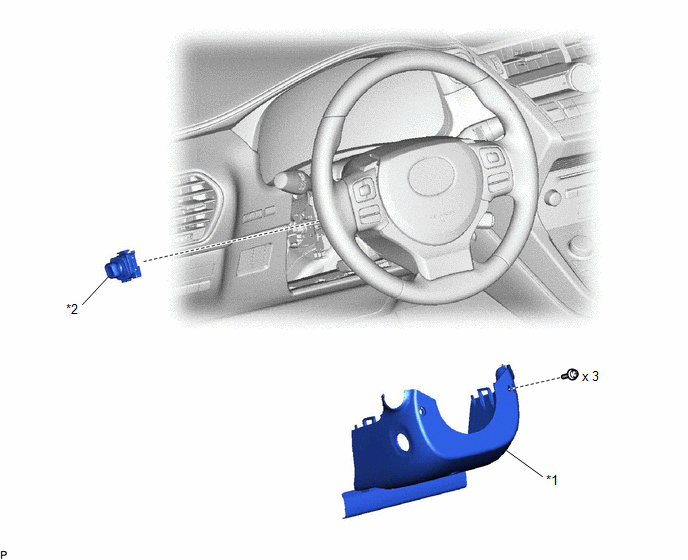
| *1 | LOWER STEERING COLUMN COVER | *2 | TILT AND TELESCOPIC SWITCH |
READ NEXT:
 Removal
REMOVAL PROCEDURE 1. PRECAUTION NOTICE: After turning the power switch is turned off, there may be a waiting time before disconnecting the auxiliary negative (-) battery terminal. Click here 2. CUST
Inspection
INSPECTION PROCEDURE 1. INSPECT TILT AND TELESCOPIC SWITCH (a) Measure the resistance according to the value(s) in the table below. Standard Resistance: Tester Connection Switch Condition S
Installation
INSTALLATION PROCEDURE 1. INSTALL TILT AND TELESCOPIC SWITCH (a) Attach the claw to install the tilt and telescopic switch. (b) Connect the connector. 2. INSTALL LOWER STEERING COLUMN COVER (a) Attach
SEE MORE:
Display Disconnected (B15D6)
DESCRIPTION The multi-display assembly and radio receiver assembly are connected by the AVC-LAN communication line. This DTC is stored when an AVC-LAN communication error occurs between the multi-display assembly and radio receiver assembly. DTC No. Detection Item DTC Detection Condition Tr
On-vehicle Inspection
ON-VEHICLE INSPECTION PROCEDURE 1. INSPECT WINDSHIELD WIPER MOTOR ASSEMBLY (a) for LH Side: (1) Check the stop (park) position. *1 Ceramic Dot *2 Louver Lip Edge *a 34 mm (1.3386 in.) *b 7.5 mm (0.2953 in.) (2) Operate the windshield wiper motor assembly.
© 2016-2026 Copyright www.lexunx.com
