Lexus NX: Components
Lexus NX Service Manual / Vehicle Exterior / Exterior Panels / Trim / Back Door Outside Garnish / Components
COMPONENTS
ILLUSTRATION
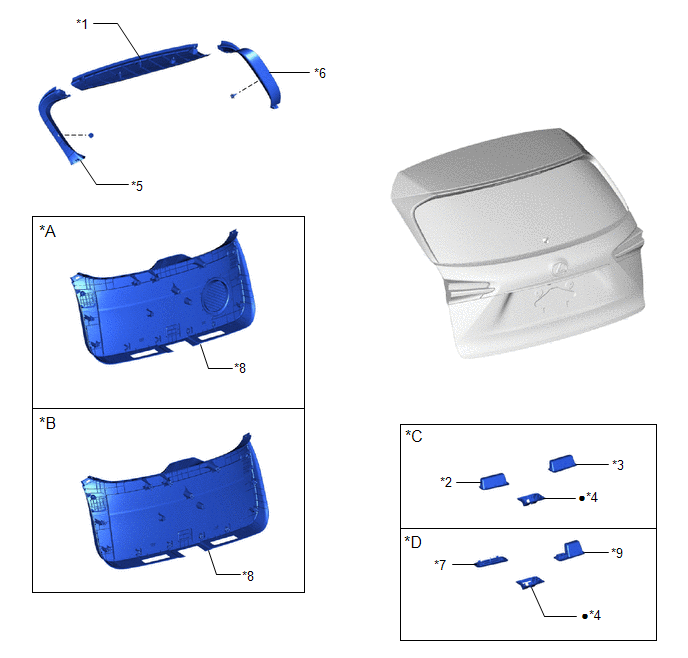
| *A | w/ Woofer | *B | w/o Woofer |
| *C | w/o Power Back Door | *D | w/ Power Back Door |
| *1 | BACK DOOR CENTER GARNISH | *2 | BACK DOOR FINISH COVER LH |
| *3 | BACK DOOR FINISH COVER RH | *4 | BACK DOOR LOCK COVER |
| *5 | BACK DOOR SIDE GARNISH LH | *6 | BACK DOOR SIDE GARNISH RH |
| *7 | BACK DOOR TRIM BASE | *8 | BACK DOOR TRIM BOARD ASSEMBLY |
| *9 | PULL HANDLE | - | - |
| ● | Non-reusable part | - | - |
ILLUSTRATION
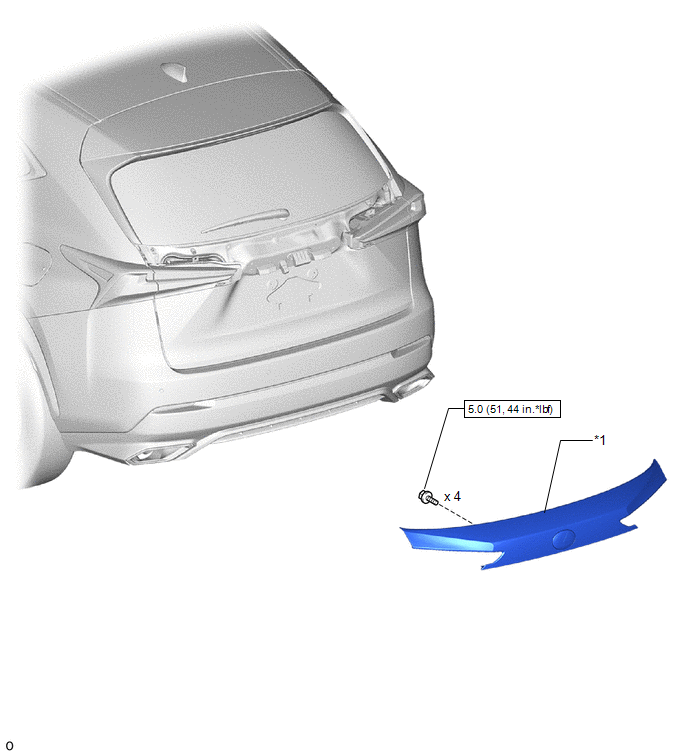
| *1 | BACK DOOR OUTSIDE GARNISH SUB-ASSEMBLY | - | - |
.png) | N*m (kgf*cm, ft.*lbf): Specified torque | - | - |
ILLUSTRATION
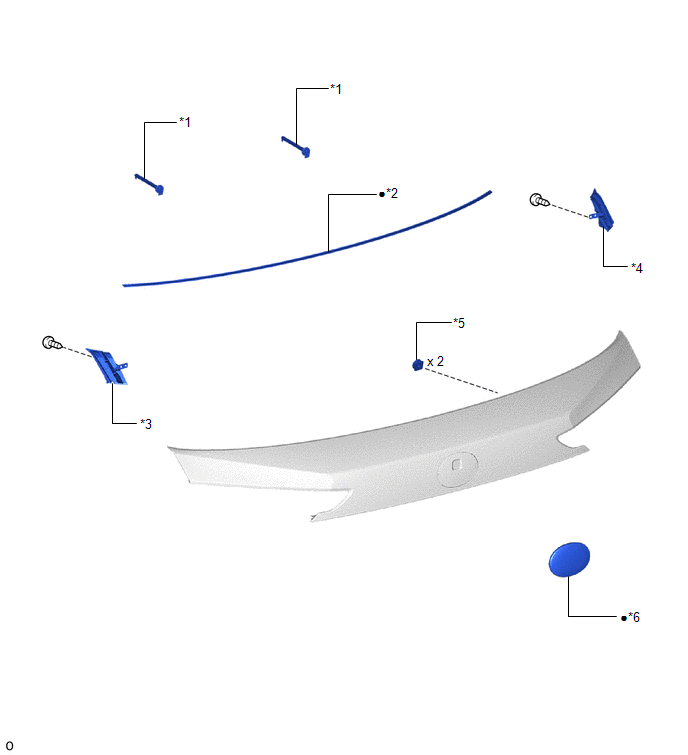
| *1 | BACK DOOR NO. 1 GARNISH RETAINER | *2 | BACK DOOR OUTSIDE GARNISH PROTECTOR |
| *3 | BACK DOOR UPPER OUTSIDE GARNISH LH | *4 | BACK DOOR UPPER OUTSIDE GARNISH RH |
| *5 | NUT | *6 | SYMBOL EMBLEM |
| ● | Non-reusable part | - | - |
READ NEXT:
 Removal
REMOVAL PROCEDURE 1. REMOVE BACK DOOR CENTER GARNISH Click here 2. REMOVE BACK DOOR SIDE GARNISH LH Click here 3. REMOVE BACK DOOR SIDE GARNISH RH Click here 4. REMOVE BACK DOOR TRIM BASE (w/ Po
Disassembly
DISASSEMBLY PROCEDURE 1. REMOVE BACK DOOR UPPER OUTSIDE GARNISH LH (a) Remove the screw and back door upper outside garnish LH. 2. REMOVE BACK DOOR UPPER OUTSIDE GARNISH RH HINT: Use th
Reassembly
REASSEMBLY PROCEDURE 1. INSTALL NUT (a) Install the 2 nuts. 2. INSTALL SYMBOL EMBLEM Click here 3. INSTALL BACK DOOR OUTSIDE GARNISH PROTECTOR (a) Clean the back door outside garnish surface. (1)
SEE MORE:
Open in Rear Door Electrical Antenna Circuit, Front Passengers Side (B27A4)
DESCRIPTION The certification ECU (smart key ECU assembly) generates a request signal and transmits the signal to the rear door outside handle assembly (for front passenger side) (electrical key antenna) at intervals of 0.25 seconds. For the rear door outside handle assembly (for front passenger sid
Lost Communication with Brake System Control Module (U0129,U0293,U1104)
DESCRIPTION The power steering ECU assembly receives signals from the hybrid vehicle control ECU, skid control ECU(brake booster with master cylinder assembly) and forward recognition camera via the CAN communication system. DTC No. Detection Item DTC Detection Condition Trouble Area Warn
© 2016-2026 Copyright www.lexunx.com
