Lexus NX: Removal
REMOVAL
PROCEDURE
1. REMOVE BACK DOOR CENTER GARNISH
Click here .gif)
2. REMOVE BACK DOOR SIDE GARNISH LH
Click here
3. REMOVE BACK DOOR SIDE GARNISH RH
Click here
4. REMOVE BACK DOOR TRIM BASE (w/ Power Back Door)
Click here
5. REMOVE PULL HANDLE (w/ Power Back Door)
Click here
6. REMOVE BACK DOOR FINISH COVER LH (w/o Power Back Door)
Click here
7. REMOVE BACK DOOR FINISH COVER RH (w/o Power Back Door)
Click here
8. REMOVE BACK DOOR LOCK COVER (w/ Power Back Door)
Click here
9. REMOVE BACK DOOR LOCK COVER (w/o Power Back Door)
Click here
10. REMOVE BACK DOOR TRIM BOARD ASSEMBLY
Click here
11. REMOVE BACK DOOR OUTSIDE GARNISH SUB-ASSEMBLY
| (a) Remove the 4 bolts. |
|
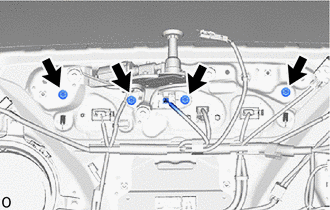
(b) Detach the 12 clips and remove the back door outside garnish sub-assembly.
READ NEXT:
 Disassembly
DISASSEMBLY PROCEDURE 1. REMOVE BACK DOOR UPPER OUTSIDE GARNISH LH (a) Remove the screw and back door upper outside garnish LH. 2. REMOVE BACK DOOR UPPER OUTSIDE GARNISH RH HINT: Use th
Reassembly
REASSEMBLY PROCEDURE 1. INSTALL NUT (a) Install the 2 nuts. 2. INSTALL SYMBOL EMBLEM Click here 3. INSTALL BACK DOOR OUTSIDE GARNISH PROTECTOR (a) Clean the back door outside garnish surface. (1)
Installation
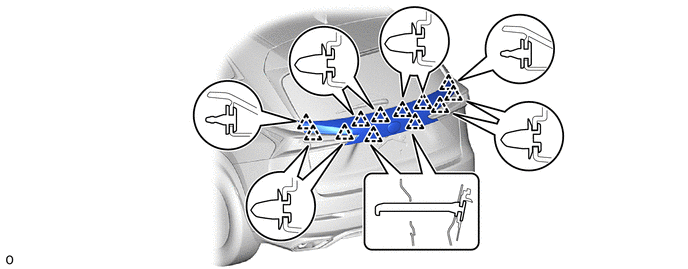
INSTALLATION PROCEDURE 1. INSTALL BACK DOOR OUTSIDE GARNISH SUB-ASSEMBLY (a) Attach the 12 clips to install the back door outside garnish sub-assembly. (b) Install the 4 bolts. Torque: 5.0 N·m {
SEE MORE:
Control Module Communication Bus "A" Off (U0073,U0155)
DESCRIPTION These DTCs are stored when the clearance warning ECU assembly cannot receive and recognize several signals via the CAN communication line. DTC No. Detection Item DTC Detection Condition Trouble Area U0073 Control Module Communication Bus "A" Off Control module communicat
Fuel Receiver Gauge Display Malfunction
DESCRIPTION OPERATION The combination meter assembly uses the fuel injection volume signal from the ECM, fuel sender gauge assembly to detect the amount of fuel remaining in the fuel tank assembly. Each gauge assembly has a variable resistor whose resistance changes according to the amount of fuel r
© 2016-2026 Copyright www.lexunx.com
