Lexus NX: Reassembly
REASSEMBLY
PROCEDURE
1. INSTALL NUT
.png)
(a) Install the 2 nuts.
2. INSTALL SYMBOL EMBLEM
Click here .gif)
3. INSTALL BACK DOOR OUTSIDE GARNISH PROTECTOR
(a) Clean the back door outside garnish surface.
(1) Remove the double-sided tape from the back door outside garnish sub-assembly.
(2) Wipe off any tape adhesive residue with cleaner.
(b) Install a new back door outside garnish protector.
(1) Remove the peeling paper from the face of the back door outside garnish protector.
HINT:
After removing the peeling paper, keep the exposed adhesive free from foreign matter.
| (2) Install the back door outside garnish protector as shown in the illustration. HINT: Press the back door outside garnish protector firmly to install it. |
|
.png)
4. INSTALL BACK DOOR NO. 1 GARNISH RETAINER
| (a) Install the 2 back door No. 1 garnish retainers. |
|
.png)
5. INSTALL BACK DOOR UPPER OUTSIDE GARNISH LH
| (a) Clean the back door outside garnish and back door upper outside garnish LH surface. (1) Remove the double-sided tape from the back door outside garnish and back door upper outside garnish LH. (2) Wipe off any tape adhesive residue with cleaner. |
|
(b) Paste a piece of new double-sided tape to back door upper outside garnish LH.
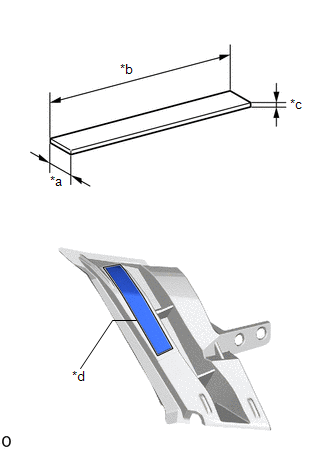
(1) Prepare double-sided tape in the size specified in the illustration.
(2) Remove the peeling paper from the face of the double-sided tape.
HINT:
After removing the peeling paper, keep the exposed adhesive free from foreign matter.
(3) Align the double-sided tape with the scribed line and apply it.
| (c) Install the back door upper outside garnish LH with the screw. |
|
.png)
6. INSTALL BACK DOOR UPPER OUTSIDE GARNISH RH
HINT:
Use the same procedure described for the LH side.
READ NEXT:
 Installation
INSTALLATION PROCEDURE 1. INSTALL BACK DOOR OUTSIDE GARNISH SUB-ASSEMBLY (a) Attach the 12 clips to install the back door outside garnish sub-assembly. (b) Install the 4 bolts. Torque: 5.0 N·m {
Components
COMPONENTS ILLUSTRATION *1 DECK FLOOR BOX LH *2 NO. 3 DECK BOARD SUB-ASSEMBLY *3 REAR DECK FLOOR BOX *4 NEGATIVE AUXILIARY BATTERY TERMINAL N*m (kgf*cm, ft.*lbf): Specified
SEE MORE:
A/C Inverter High Voltage Output System Malfunction (B1472)
DESCRIPTION The inverter in the compressor with motor assembly outputs high-voltage to operate the motor. If there is an open or short in the output circuit, the hybrid vehicle control ECU will stop compressor operation and store this DTC. This DTC will be stored as a history DTC. The compressor ope
Problem Symptoms Table
PROBLEM SYMPTOMS TABLE NOTICE:
If the auxiliary battery voltage is low, the PTC heater, seat heater system (w/ Seat Heater System) and climate control seat system (w/ Climate Control Seat System) may not operate. When "High Power Consumption Partial Limit On AC/Heater Operation." is displayed on
