Lexus NX: Components
Lexus NX Service Manual / Audio & Visual & Telematics / Audio / Video / Back Door Speaker / Components
COMPONENTS
ILLUSTRATION
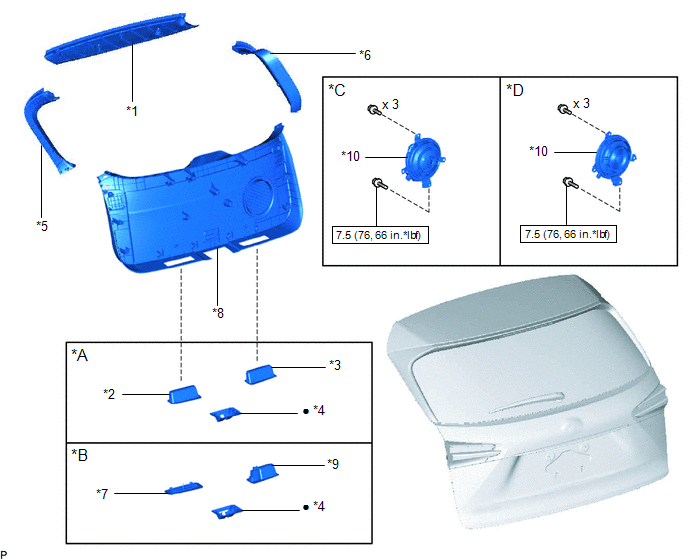
| *A | w/o Power Back Door | *B | w/ Power Back Door |
| *C | for 10 Speakers | *D | for 14 Speakers |
| *1 | BACK DOOR CENTER GARNISH | *2 | BACK DOOR FINISH COVER LH |
| *3 | BACK DOOR FINISH COVER RH | *4 | BACK DOOR LOCK COVER |
| *5 | BACK DOOR SIDE GARNISH LH | *6 | BACK DOOR SIDE GARNISH RH |
| *7 | BACK DOOR TRIM BASE | *8 | BACK DOOR TRIM BOARD ASSEMBLY |
| *9 | PULL HANDLE | *10 | REAR NO. 3 SPEAKER ASSEMBLY |
.png) | N*m (kgf*cm, ft.*lbf): Specified torque | ● | Non-reusable part |
READ NEXT:
 Removal
REMOVAL PROCEDURE 1. REMOVE BACK DOOR CENTER GARNISH Click here 2. REMOVE BACK DOOR SIDE GARNISH LH Click here 3. REMOVE BACK DOOR SIDE GARNISH RH Click here 4. REMOVE BACK DOOR TRIM BASE (w/
Inspection
INSPECTION PROCEDURE 1. INSPECT REAR NO. 3 SPEAKER ASSEMBLY (a) Measure the resistance according to the value(s) in the table below. Standard Resistance: for 10 Speakers Tester Connection Con
Installation
INSTALLATION PROCEDURE 1. INSTALL REAR NO. 3 SPEAKER ASSEMBLY NOTICE: Do not touch the cone of the speaker. (a) Temporarily install the speaker by attaching the clip of the speaker to the back door
SEE MORE:
Procedure
PROCEDURE PROCEDURE 1. CUSTOMIZE DYNAMIC RADAR CRUISE CONTROL SYSTEM Click here 2. CUSTOMIZE LANE TRACING ASSIST SYSTEM Click here 3. CUSTOMIZE ROAD SIGN ASSIST SYSTEM Click here 4. CUSTOMIZE ADAPTIVE VARIABLE SUSPENSION SYSTEM Click here 5. CUSTOMIZE POWER TILT AND POWER TELESCOPIC STEERING
Front Camera Module Communication Stop Mode
DESCRIPTION Detection Item Symptom Trouble Area Front Camera Module Communication Stop Mode Any of the following conditions are met:
Communication stop for "Front Camera Module" is indicated on the "Communication Bus Check" screen of the Techstream.
Click here
Communication sys
© 2016-2026 Copyright www.lexunx.com
