Lexus NX: Inspection
Lexus NX Service Manual / Audio & Visual & Telematics / Audio / Video / Back Door Speaker / Inspection
INSPECTION
PROCEDURE
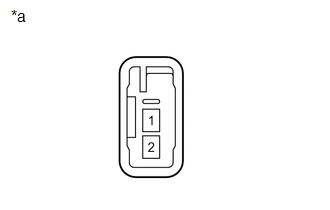
1. INSPECT REAR NO. 3 SPEAKER ASSEMBLY
| (a) Measure the resistance according to the value(s) in the table below. Standard Resistance: for 10 Speakers
If the result is not as specified, replace the rear No. 3 speaker assembly. |
|
READ NEXT:
 Installation
INSTALLATION PROCEDURE 1. INSTALL REAR NO. 3 SPEAKER ASSEMBLY NOTICE: Do not touch the cone of the speaker. (a) Temporarily install the speaker by attaching the clip of the speaker to the back door
Components
COMPONENTS ILLUSTRATION *A for 8 Speakers *B for 10 Speakers *C for 14 Speakers - - *1 FRONT DOOR INSIDE HANDLE BEZEL PLUG LH *2 FRONT DOOR TRIM BOARD SUB-ASSEMBLY LH
SEE MORE:
Stereo Jack Adapter Light does not Illuminate
DESCRIPTION Power is supplied to the No. 1 stereo jack adapter assembly illumination from the radio receiver assembly. WIRING DIAGRAM CAUTION / NOTICE / HINT NOTICE: When replacing the radio receiver assembly, always replace it with a new one. If a radio receiver assembly which was installed to ano
Internal Control Module Software Incompatibility Not Programmed (U030051,U030057)
DESCRIPTION
The forward recognition camera receives vehicle information (Conv/HV) from the hybrid vehicle control ECU via the CAN communication line.
When the forward recognition camera is unable to determine the vehicle information (Conv/HV) from the vehicle information (Conv/HV) sent from the
© 2016-2026 Copyright www.lexunx.com
