Lexus NX: Removal
REMOVAL
PROCEDURE
1. REMOVE BACK DOOR CENTER GARNISH
Click here .gif)
2. REMOVE BACK DOOR SIDE GARNISH LH
Click here
3. REMOVE BACK DOOR SIDE GARNISH RH
Click here
4. REMOVE BACK DOOR TRIM BASE (w/ Power Back Door)
Click here
5. REMOVE PULL HANDLE (w/ Power Back Door)
Click here
6. REMOVE BACK DOOR FINISH COVER LH (w/o Power Back Door)
Click here
7. REMOVE BACK DOOR FINISH COVER RH (w/o Power Back Door)
Click here
8. REMOVE BACK DOOR LOCK COVER (w/ Power Back Door)
Click here
9. REMOVE BACK DOOR LOCK COVER (w/o Power Back Door)
Click here
10. REMOVE BACK DOOR TRIM BOARD ASSEMBLY
Click here
11. REMOVE REAR NO. 3 SPEAKER ASSEMBLY
| (a) Disconnect the connector and remove the 4 bolts. |
|
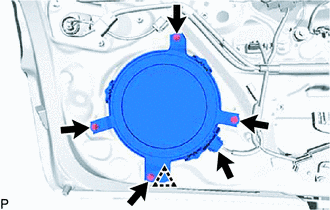
(b) Detach the clip and remove the rear No. 3 speaker assembly.
READ NEXT:
 Inspection
INSPECTION PROCEDURE 1. INSPECT REAR NO. 3 SPEAKER ASSEMBLY (a) Measure the resistance according to the value(s) in the table below. Standard Resistance: for 10 Speakers Tester Connection Con
Installation
INSTALLATION PROCEDURE 1. INSTALL REAR NO. 3 SPEAKER ASSEMBLY NOTICE: Do not touch the cone of the speaker. (a) Temporarily install the speaker by attaching the clip of the speaker to the back door
SEE MORE:
Power Mirror cannot be Adjusted with Power Mirror Switch
DESCRIPTION When the outer mirror switch assembly mirror select switch is operated, right/left selection signals are sent to the main body ECU (multiplex network body ECU). The main body ECU (multiplex network body ECU) sends the received right/left selection signals to the outer mirror control ECU
System Description
SYSTEM DESCRIPTION GENERAL (a) This system has front, passenger side, driver side and rear television camera assemblies mounted around the vehicle to display around the vehicle on the multi-display assembly. The display panel also shows a composite view consisting of the area behind the vehicle and
