Lexus NX: Installation
INSTALLATION
PROCEDURE
1. INSTALL REAR NO. 3 SPEAKER ASSEMBLY
NOTICE:
Do not touch the cone of the speaker.
| (a) Temporarily install the speaker by attaching the clip of the speaker to the back door panel. |
|
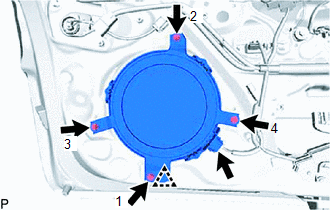
(b) Install the rear speaker assembly with the 4 bolts.
HINT:
Tighten the bolts in the order shown in the illustration.
NOTICE:
Pay attention when installing the bolts, as the bolt labeled 1 has a different length from the other 3 bolts.
Torque:
BOLT 1 :
7.5 N·m {76 kgf·cm, 66 in·lbf}
(c) Connect the connector.
2. INSTALL BACK DOOR TRIM BOARD ASSEMBLY
Click here .gif)
3. INSTALL BACK DOOR LOCK COVER (w/o Power Back Door)
Click here
4. INSTALL BACK DOOR LOCK COVER (w/ Power Back Door)
Click here
5. INSTALL BACK DOOR FINISH COVER RH (w/o Power Back Door)
Click here
6. INSTALL BACK DOOR FINISH COVER LH (w/o Power Back Door)
Click here
7. INSTALL PULL HANDLE (w/ Power Back Door)
Click here
8. INSTALL BACK DOOR TRIM BASE (w/ Power Back Door)
Click here
9. INSTALL BACK DOOR SIDE GARNISH RH
Click here
10. INSTALL BACK DOOR SIDE GARNISH LH
Click here
11. INSTALL BACK DOOR CENTER GARNISH
Click here
READ NEXT:
 Components
COMPONENTS ILLUSTRATION *A for 8 Speakers *B for 10 Speakers *C for 14 Speakers - - *1 FRONT DOOR INSIDE HANDLE BEZEL PLUG LH *2 FRONT DOOR TRIM BOARD SUB-ASSEMBLY LH
Removal
REMOVAL CAUTION / NOTICE / HINT HINT:
Use the same procedure for the RH and LH sides.
The procedure listed below is for the LH side.
PROCEDURE 1. REMOVE FRONT DOOR TRIM COVER LH Click here
SEE MORE:
Components
COMPONENTS ILLUSTRATION *A w/ Steering Heater - - *1 CRUISE CONTROL MAIN SWITCH *2 SHIFT PADDLE SWITCH (TRANSMISSION SHIFT SWITCH ASSEMBLY) *3 STEERING PAD SWITCH ASSEMBLY *4 STEERING SHAKE DAMPER *5 STEERING WHEEL ASSEMBLY *6 STEERING WHEEL HEATER CONTROL ASS
Speaker Circuit (B1360)
DESCRIPTION This DTC is stored when a connection malfunction, such as an open, is detected in the wire harness between the stereo component equalizer assembly and No. 1 speaker assembly with box. DTC No. Detection Item DTC Detection Condition Trouble Area B1360 Speaker Circuit Open
