Lexus NX: Components
COMPONENTS
ILLUSTRATION
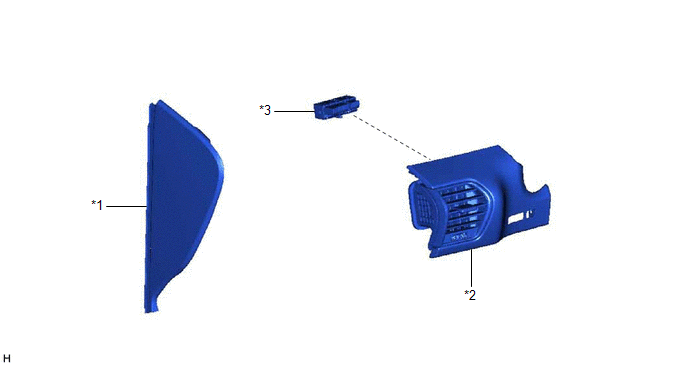
| *1 | INSTRUMENT SIDE PANEL LH | *2 | NO. 1 INSTRUMENT PANEL SAFETY PAD SUB-ASSEMBLY |
| *3 | TRIP SWITCH | - | - |
READ NEXT:
 Removal
REMOVAL PROCEDURE 1. REMOVE INSTRUMENT SIDE PANEL LH Click here 2. REMOVE NO. 1 INSTRUMENT PANEL SAFETY PAD SUB-ASSEMBLY Click here 3. REMOVE TRIP SWITCH (a) Using a screwdriver, detach the
Inspection
INSPECTION PROCEDURE 1. INSPECT TRIP SWITCH *1 ODO TRIP Switch *a Component without harness connected (Trip Switch) (a) Check the resistance. Measure the resistance according to the val
Installation
INSTALLATION PROCEDURE 1. INSTALL TRIP SWITCH (a) Attach the 2 claws to install the trip switch. 2. INSTALL NO. 1 INSTRUMENT PANEL SAFETY PAD SUB-ASSEMBLY Click here 3. INSTALL INST
SEE MORE:
Precaution
PRECAUTION FOR OPERATION OF ELECTRICAL ITEMS RESTRICTED NOTICE:
If the auxiliary battery voltage is low, the seat heater system may not operate. When "High Power Consumption / Partial Limit On AC/Heater Operation" is displayed on the multi-information display in the combination meter assembly, in
HD Radio Tuner Malfunction (B1551,B15A0,B15B3,B15B5,B15B7,B15BA,B15F9)
DESCRIPTION These DTCs are stored when a malfunction occurs in the radio receiver assembly DTC No. Detection Item DTC Detection Condition Trouble Area B1551 HD Radio Tuner Malfunction When one of the conditions below is met:
"HD Radio" tuner decoder malfunction
"HD Radio" tuner
© 2016-2026 Copyright www.lexunx.com
