Lexus NX: Components
COMPONENTS
ILLUSTRATION
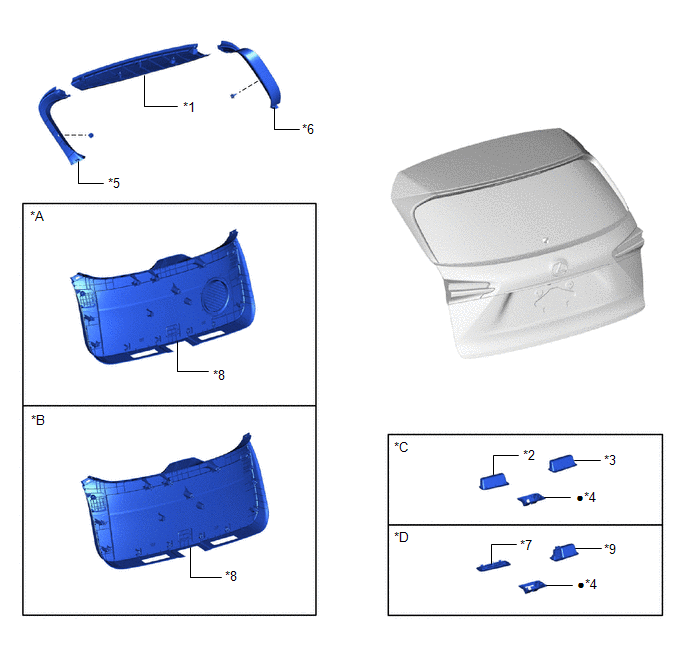
| *A | w/ Woofer | *B | w/o Woofer |
| *C | w/o Power Back Door | *D | w/ Power Back Door |
| *1 | BACK DOOR CENTER GARNISH | *2 | BACK DOOR FINISH COVER LH |
| *3 | BACK DOOR FINISH COVER RH | *4 | BACK DOOR LOCK COVER |
| *5 | BACK DOOR SIDE GARNISH LH | *6 | BACK DOOR SIDE GARNISH RH |
| *7 | BACK DOOR TRIM BASE | *8 | BACK DOOR TRIM BOARD ASSEMBLY |
| *9 | PULL HANDLE | - | - |
| ● | Non-reusable part | - | - |
ILLUSTRATION
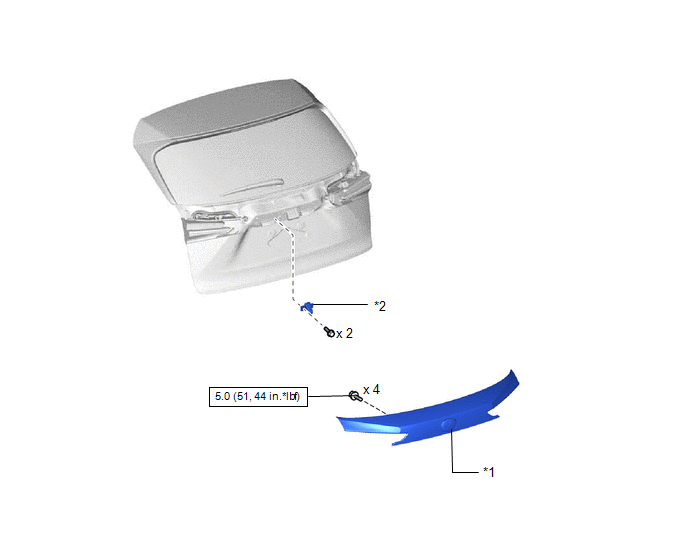
| *1 | BACK DOOR OUTSIDE GARNISH SUB-ASSEMBLY | *2 | REAR TELEVISION CAMERA ASSEMBLY |
.png) | N*m (kgf*cm, ft.*lbf): Specified torque | - | - |
READ NEXT:
 Removal
REMOVAL PROCEDURE 1. PRECAUTION (a) w/ Parking Assist Monitor System: Click here (b) w/ Panoramic View Monitor System: Click here 2. REMOVE BACK DOOR TRIM BASE (w/ Power Back Door) Click here 3.
Installation
INSTALLATION PROCEDURE 1. INSTALL REAR TELEVISION CAMERA ASSEMBLY (a) Install the 2 screws and rear television camera assembly. (b) Connect the connector. 2. INSTALL BACK DOOR OUTSIDE GARNISH SUB-ASSE
SEE MORE:
Components
COMPONENTS ILLUSTRATION *1 CLEARANCE LIGHT ASSEMBLY LH *2 CLEARANCE LIGHT ASSEMBLY RH *3 FRONT BUMPER GUARD ASSEMBLY *4 HOOD TO FRONT END PANEL SEAL *5 NO. 3 ENGINE ROOM WIRE *6 RADIATOR GRILLE SUB-ASSEMBLY *7 OUTSIDE MOULDING RETAINER - - ILLUSTRATION
Installation
INSTALLATION PROCEDURE 1. INSTALL CLEARANCE WARNING ECU ASSEMBLY (a) Attach the 2 claws to install the clearance warning ECU assembly. 2. INSTALL ECU INTEGRATION BOX RH Click here 3. INSTALL NO. 2 INSTRUMENT PANEL UNDER COVER SUB-ASSEMBLY Click here 4. INSTALL GLOVE COMPARTMENT DOOR ASSEMBLY Cli
© 2016-2026 Copyright www.lexunx.com
