Lexus NX: Inspection
INSPECTION
PROCEDURE
1. INSPECT FRONT LOWER BALL JOINT ASSEMBLY LH
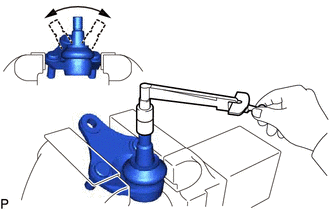
| (a) Inspect the turning torque of the ball joint. (1) Secure the front lower ball joint in a vise using aluminum plates. (2) Install the nut to the front lower ball joint stud. (3) Move the stud back and forth several times. Using a torque wrench, turn the nut continuously at a rate of 3 to 5 seconds per turn and take the torque reading on the 5th turn. Standard turning torque: 0.98 to 3.43 N*m (10 to 35 kgf*cm, 8.7 to 30 in.*lbf) If the turning torque is not within the specified range, replace the front lower ball joint with a new one. |
|
(b) Inspect the dust cover.
(1) Check that the dust cover is not cracked and that there is no grease on it.
READ NEXT:
 Installation
INSTALLATION CAUTION / NOTICE / HINT NOTICE:
When the brake pedal is first depressed after replacing the brake pads or pushing back the disc brake piston, DTC C1214 may be output. As there is no ma
Front Lower Suspension Arm
ComponentsCOMPONENTS ILLUSTRATION *1 FRONT LOWER NO. 1 SUSPENSION ARM SUB-ASSEMBLY LH *2 FRONT SUSPENSION CROSSMEMBER SUB-ASSEMBLY N*m (kgf*cm, ft.*lbf): Specified torque * For u
SEE MORE:
Turn Signal Switch Circuit
DESCRIPTION The combination meter receives the turn signal switch information and controls the turn signal lights. WIRING DIAGRAM CAUTION / NOTICE / HINT NOTICE: When replacing the combination meter assembly, make sure to replace it with a new one. PROCEDURE 1. READ VALUE USING TECHSTREAM (TU
Panel Switches do not Function
CAUTION / NOTICE / HINT NOTICE: When replacing the radio receiver assembly, always replace it with a new one. If a radio receiver assembly which was installed to another vehicle is used, the following may occur:
A communication malfunction DTC may be stored.
The radio receiver assembly may not
© 2016-2026 Copyright www.lexunx.com
