Lexus NX: Inspection
INSPECTION
PROCEDURE
1. INSPECT FRONT STABILIZER LINK ASSEMBLY LH
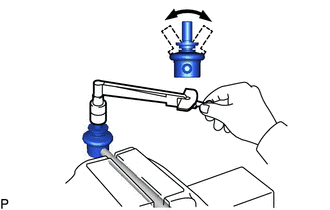
| (a) Inspect the turning torque of the ball joint. (1) Secure the front stabilizer link assembly in a vise using aluminum plates. (2) Install the nut to the front stabilizer link assembly stud. (3) Move the stud back and forth several times. Using a torque wrench, turn the nut continuously at a rate of 3 to 5 seconds per turn and take the torque reading on the 5th turn. Standard turning torque: 0.05 to 1.96 N*m (0.5 to 20 kgf*cm, 0.4 to 17 in.*lbf) If the turning torque is not within the specified range, replace the front stabilizer link assembly with a new one. |
|
(b) Inspect the dust cover.
(1) Check that the dust cover is not cracked and that there is no grease on it.
READ NEXT:
 Installation
INSTALLATION PROCEDURE 1. INSTALL FRONT STABILIZER BAR BUSHING LH *1 Stopper Front of the Vehicle (a) Install the front stabilizer bar bushing to the front stabilizer bar as shown in t
Components
COMPONENTS ILLUSTRATION *1 FRONT CENTER FLOOR COVER LH *2 NO. 1 ENGINE UNDER COVER ASSEMBLY *3 REAR ENGINE UNDER COVER LH *4 REAR ENGINE UNDER COVER RH ILLUSTRATION *1 FRO
SEE MORE:
Remote Touch Screen Does not Generate Vibration Feedback
DESCRIPTION When each button displayed on the multi-display assembly is selected via remote touch screen operation, the remote touch screen generates vibration feedback according to communication between the remote touch and radio receiver assembly. CAUTION / NOTICE / HINT NOTICE: When replacing the
Open in Rear Door Electrical Antenna Circuit, Front Passengers Side (B27A4)
DESCRIPTION The certification ECU (smart key ECU assembly) generates a request signal and transmits the signal to the rear door outside handle assembly (for front passenger side) (electrical key antenna) at intervals of 0.25 seconds. For the rear door outside handle assembly (for front passenger sid
© 2016-2026 Copyright www.lexunx.com
