Lexus NX: Inspection
INSPECTION
PROCEDURE
1. INSPECT LEVEL WARNING SWITCH ASSEMBLY
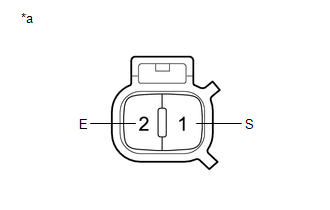
| *a | Component without harness connected (Level Warning Switch Assembly) |
HINT:
The following check should be performed with the level warning switch assembly installed to the windshield washer jar assembly.
(a) Fill the windshield washer jar assembly with washer fluid.
(b) Measure the resistance according to the value(s) in the table below.
Standard Resistance:
| Tester Connection | Condition | Specified Condition |
|---|---|---|
| 1 (S) - 2 (E) | Fluid volume is 600 to 800 cc (36.6 to 48.8 cu.in.) or more* | 10 kΩ or higher |
| Fluid volume is 600 to 800 cc (36.6 to 48.8 cu.in.) or less* | Below 1 Ω |
HINT:
*: The level warning switch assembly begins operating when the fluid volume is 600 to 800 cc (36.6 to 48.8 cu.in.) depending on the vehicle condition.
If the result is not as specified, replace the level warning switch assembly.
READ NEXT:
 Installation
INSTALLATION PROCEDURE 1. INSTALL LEVEL WARNING SWITCH ASSEMBLY (a) Install the level warning switch assembly as shown in the illustration. NOTICE: Make sure that the protrusion of the level warnin
Components
COMPONENTS ILLUSTRATION *1 FRONT FENDER FRONT SPLASH SHIELD RH *2 FRONT FENDER LINER RH *3 FRONT FENDER MOULDING SUB-ASSEMBLY RH *4 NO. 1 MOULDING TAPE *5 NO. 2 MOULDING TAPE
SEE MORE:
Front Right Sensor Malfunction (C1AE4)
DESCRIPTION The front corner ultrasonic sensor (FR sensor) is installed to the front bumper. The clearance warning ECU assembly detects obstacles based on signals received from the front corner ultrasonic sensor (FR sensor). If the front corner ultrasonic sensor (FR sensor) has an open circuit or ot
Front Left Center Sensor (C1AE2)
DESCRIPTION The front center ultrasonic sensor (FLC sensor) is installed to the front bumper. The clearance warning ECU assembly detects obstacles based on signals received from the front center ultrasonic sensor (FLC sensor). If the front center ultrasonic sensor (FLC sensor) has an open circuit or
