Lexus NX: Installation
INSTALLATION
PROCEDURE
1. INSTALL LEVEL WARNING SWITCH ASSEMBLY
| (a) Install the level warning switch assembly as shown in the illustration. NOTICE: Make sure that the protrusion of the level warning switch assembly is between the 2 markings. |
|
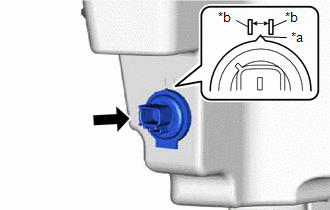
(b) Connect the connector.
2. FILL UP WINDSHIELD WASHER JAR AND PUMP ASSEMBLY WITH WASHER FLUID
(a) Connect the washer hose to the windshield washer motor and pump, and fill the washer jar with washer fluid.
3. INSTALL FRONT FENDER LINER RH
Click here .gif)
4. INSTALL FRONT FENDER FRONT SPLASH SHIELD RH
HINT:
Use the same procedure described for the LH side.
Click here
5. INSTALL NO. 1 MOULDING TAPE
HINT:
Use the same procedure described for the LH side.
Click here
6. INSTALL NO. 2 MOULDING TAPE
HINT:
Use the same procedure described for the LH side.
Click here
7. INSTALL FRONT FENDER MOULDING SUB-ASSEMBLY RH
HINT:
Use the same procedure described for the LH side.
Click here
8. INSTALL FRONT WHEEL RH
Click here
READ NEXT:
 Components
COMPONENTS ILLUSTRATION *1 FRONT FENDER FRONT SPLASH SHIELD RH *2 FRONT FENDER LINER RH *3 FRONT FENDER MOULDING SUB-ASSEMBLY RH *4 NO. 1 MOULDING TAPE *5 NO. 2 MOULDING TAPE
Removal
REMOVAL PROCEDURE 1. REMOVE FRONT WHEEL RH Click here 2. REMOVE FRONT FENDER MOULDING SUB-ASSEMBLY RH HINT: Use the same procedure described for the LH side. Click here 3. REMOVE NO. 1 MOULDING TA
SEE MORE:
Diagnosis System
DIAGNOSIS SYSTEM DESCRIPTION (a) Front power seat control system (w/ Memory) data and Diagnostic Trouble Codes (DTCs) can be read through the Data Link Connector 3 (DLC3) of the vehicle. When the system seems to be malfunctioning, use the Techstream to check for malfunctions and perform repairs. CHE
Control Module Communication Bus "A" Off (U0073,U0155)
DESCRIPTION These DTCs are stored when the clearance warning ECU assembly cannot receive and recognize several signals via the CAN communication line. DTC No. Detection Item DTC Detection Condition Trouble Area U0073 Control Module Communication Bus "A" Off Control module communicat
