Lexus NX: Inspection
INSPECTION
PROCEDURE
1. INSPECT WINDSHIELD WASHER MOTOR AND PUMP ASSEMBLY (for Front Side)
HINT:
This check should be performed with the windshield washer motor and pump assembly installed to the windshield washer jar assembly.
(a) With the windshield washer motor and pump assembly installed to the washer jar, pour windshield washer fluid into the washer jar.
| (b) Check that the windshield washer fluid is pumped when auxiliary battery voltage is applied to the terminals. OK:
If the result is not as specified, replace the windshield washer motor and pump assembly. |
|

2. INSPECT WINDSHIELD WASHER MOTOR AND PUMP ASSEMBLY (for Rear Side)
HINT:
This check should be performed with the windshield washer motor and pump assembly installed to the windshield washer jar assembly.
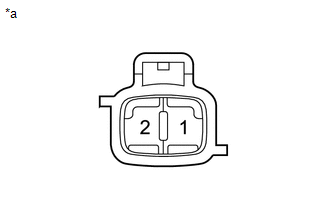
| *a | Component without harness connected (Windshield Washer Motor and Pump Assembly) |
(a) With the windshield washer motor and pump assembly installed to the washer jar, pour windshield washer fluid into the washer jar.
(b) Check that the windshield washer fluid is pumped when auxiliary battery voltage is applied to the terminals.
OK:
| Measurement Condition | Specified Condition |
|---|---|
| Auxiliary battery positive (+) → Terminal 2 Auxiliary battery negative (-) → Terminal 1 | Washer fluid is pumped to rear side |
If the result is not as specified, replace the windshield washer motor and pump assembly.
READ NEXT:
 Installation
INSTALLATION PROCEDURE 1. INSTALL WINDSHIELD WASHER JAR ASSEMBLY (w/ Headlight Cleaner System) (a) Install the level warning switch assembly as shown in the illustration. NOTICE: Make sure that the
Washer Nozzle
ComponentsCOMPONENTS ILLUSTRATION *1 HOOD INSULATOR *2 WASHER NOZZLE SUB-ASSEMBLY *3 WASHER HOSE - - ● Non-reusable part - - On-vehicle InspectionON-VEHICLE INSPEC
Washer Nozzle(for Rear Side)
ComponentsCOMPONENTS ILLUSTRATION *1 REAR WASHER NOZZLE *2 REAR WASHER HOSE On-vehicle InspectionON-VEHICLE INSPECTION PROCEDURE 1. INSPECT REAR WASHER NOZZLE (a) With the power switch
SEE MORE:
Installation
INSTALLATION CAUTION / NOTICE / HINT NOTICE:
Handle components indoors as much as possible to prevent foreign matter from entering and adhering to headlight assembly components.
Do not reuse parts which have reduced fastening ability due to thread damage.
When installing components, make sure
Adjustment
ADJUSTMENT CAUTION / NOTICE / HINT HINT:
Use the same procedure for the RH and LH sides.
The procedure listed below is for the LH side.
It is possible that a fog light assembly is incorrectly installed, affecting fog light aim. Fog light assembly installation should be considered prior to per
