Lexus NX: Washer Nozzle(for Rear Side)
Components
COMPONENTS
ILLUSTRATION
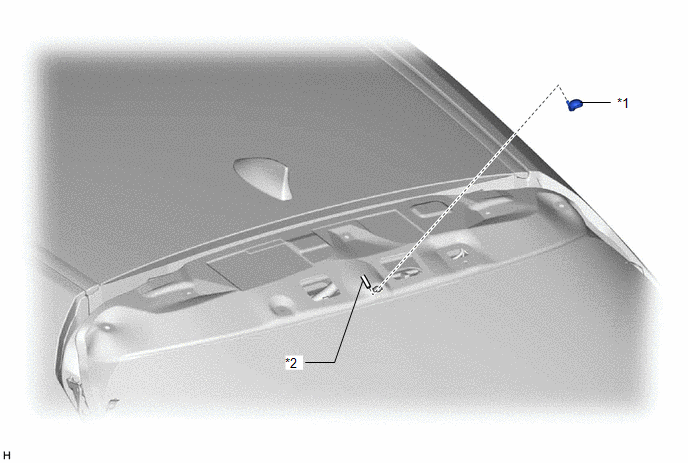
| *1 | REAR WASHER NOZZLE | *2 | REAR WASHER HOSE |
On-vehicle Inspection
ON-VEHICLE INSPECTION
PROCEDURE
1. INSPECT REAR WASHER NOZZLE
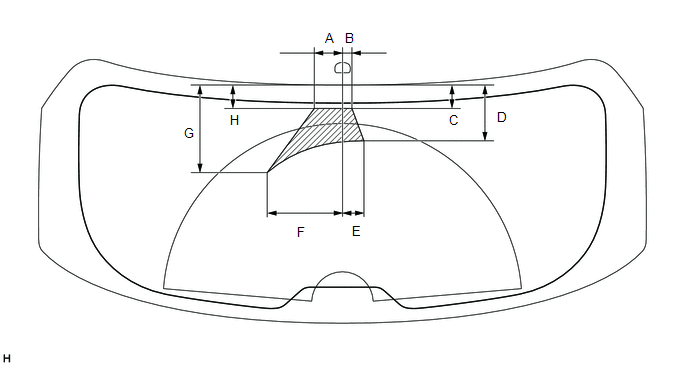
(a) With the power switch turned on (IG), check that the center stream of washer fluid sprays on the back door glass within the hatched area shown in the illustration.
OK:
Washer fluid hits the back door glass in the area shown in the illustration.
If the result is not as specified, adjust the rear washer nozzle sub-assembly.
.png) | Standard Clearance | - | - |
Standard:
| Area | Specified Condition | Area | Specified Condition |
|---|---|---|---|
| A | 57 mm (2.2441 in.) | B | 19 mm (0.7480 in.) |
| C | 48 mm (1.8898 in.) | D | 115 mm (4.5276 in.) |
| E | 44 mm (1.7323 in.) | F | 155 mm (6.1024 in.) |
| G | 182 mm (7.1653 in.) | H | 48 mm (1.8898 in.) |
NOTICE:
If the result is not as specified, adjust the rear washer nozzle.
Click here .gif)
Removal
REMOVAL
PROCEDURE
1. REMOVE REAR SPOILER ASSEMBLY
Click here .gif)
2. REMOVE REAR WASHER NOZZLE
| (a) Disconnect the rear washer hose from the rear washer nozzle. |
|
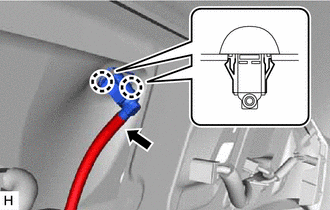
(b) Detach the 2 claws and remove the rear washer nozzle.
Adjustment
ADJUSTMENT
PROCEDURE
1. ADJUST REAR WASHER NOZZLE
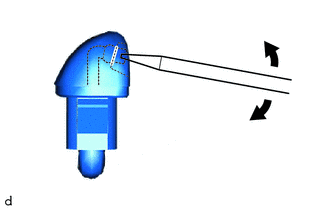
| (a) Using a screwdriver, adjust the nozzle jet of the rear washer nozzle so that the contact area is within the standard. Click here NOTICE: Do not use a safety pin or other pointed tools. Doing so may damage the inside of the rear washer nozzle sub-assembly. HINT: Use a thin-bladed screwdriver with a tip approximately 1 mm (0.0394 in.) thick. |
|
.gif)
Installation
INSTALLATION
PROCEDURE
1. INSTALL REAR WASHER NOZZLE
(a) Attach the 2 claws to install the rear washer nozzle.
(b) Connect the rear washer hose to the rear washer nozzle.
2. INSTALL REAR SPOILER ASSEMBLY
Click here .gif)
READ NEXT:
 Precaution
PRECAUTION PRECAUTION OF WASHER NOZZLE ADJUSTMENT (a) Do not clean or adjust the washer nozzle with a safety pin, etc. because: (1) The washer nozzle tip is made of resin and could be damaged. (2) Adj
Parts Location
PARTS LOCATION ILLUSTRATION *A w/ Rain Sensor *B w/ Headlight Cleaner System *C for Triple Beam Headlight *D for Single Beam Headlight *1 WINDSHIELD WIPER MOTOR ASSEMBLY *2
SEE MORE:
Removal
REMOVAL PROCEDURE 1. REMOVE CONSOLE ARMREST ASSEMBLY Click here 2. REMOVE UPPER REAR CONSOLE PANEL Click here 3. REMOVE UPPER NO. 2 CONSOLE PANEL GARNISH Click here 4. REMOVE UPPER NO. 1 CONSOLE PANEL GARNISH Click here 5. REMOVE INSTRUMENT SIDE PANEL LH Click here 6. REMOVE NO. 1 INS
Drive Shaft System
Problem Symptoms TablePROBLEM SYMPTOMS TABLE HINT: Use the table below to help determine the cause of problem symptoms. If multiple suspected areas are listed, the potential causes of the symptoms are listed in order of probability in the "Suspected Area" column of the table. Check each symptom by
