Lexus NX: Inspection
INSPECTION
PROCEDURE
1. INSPECT SEPARATE TYPE FRONT SEATBACK COVER LH
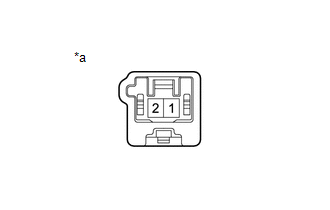
| *a | Component without harness connected (Separate Type Front Seatback Cover LH (Front Seatback Heater)) |
(a) Check the separate type front seatback cover LH (front seatback heater).
(1) Measure the resistance according to the value(s) in the table below.
Standard Resistance:
| Tester Connection | Condition | Specified Condition |
|---|---|---|
| 1 - 2 | Seatback heater temperature 20°C (68°F) | 4.68 to 5.71 Ω |
If the result is not as specified, replace the separate type front seatback cover LH (front seatback heater).
2. INSPECT SEPARATE TYPE FRONT SEATBACK COVER RH
| *a | Component without harness connected (Separate Type Front Seatback Cover RH (Front Seatback Heater)) |
(a) Check the separate type front seatback cover RH (front seatback heater).
(1) Measure the resistance according to the value(s) in the table below.
Standard Resistance:
| Tester Connection | Condition | Specified Condition |
|---|---|---|
| 1 - 2 | Seatback heater temperature 20°C (68°F) | 4.68 to 5.71 Ω |
If the result is not as specified, replace the separate type front seatback cover RH (front seatback heater).
READ NEXT:
 Installation
INSTALLATION CAUTION / NOTICE / HINT CAUTION: Wear protective gloves. Sharp areas on the parts may injure your hands. HINT:
Use the same procedure for the RH and LH sides.
The procedure listed be
Components
COMPONENTS ILLUSTRATION *1 FRONT INNER SEAT CUSHION SHIELD LH *2 FRONT LOWER SEAT CUSHION SHIELD *3 FRONT SEAT CUSHION SHIELD LH *4 FRONT SEAT HEADREST SUPPORT *5 SEATBACK FE
SEE MORE:
System Description
SYSTEM DESCRIPTION SLIDING ROOF SYSTEM DESCRIPTION (a) The sliding roof system controls the sliding roof operation using the sliding roof drive gear sub-assembly (sliding roof ECU). Operating the map light assembly sliding (slide roof switch) results in electrical power being transmitted to the slid
Terminals Of Ecu
TERMINALS OF ECU CHECK AIR CONDITIONING AMPLIFIER ASSEMBLY (a) Disconnect the I50 air conditioning amplifier assembly connector. (b) Measure the voltage and resistance according to the value(s) in the table below. Tester Connection Wiring Color Terminal Description Condition Specified Co
