Lexus NX: Removal
REMOVAL
PROCEDURE
1. DRAIN ENGINE COOLANT
Click here .gif)
2. REMOVE NO. 1 ENGINE COVER SUB-ASSEMBLY
Click here
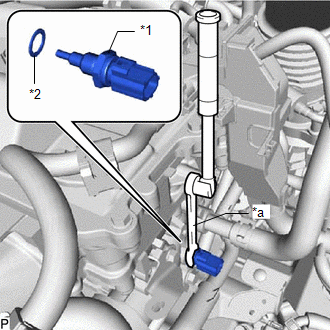
3. REMOVE ENGINE COOLANT TEMPERATURE SENSOR
| (a) Disconnect the engine coolant temperature sensor connector. |
|
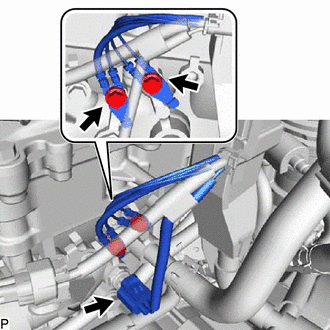
(b) Remove the 2 bolts and disconnect the 2 ground wires.
| (c) Using a 19 mm ball joint lock nut wrench, remove the engine coolant temperature sensor and gasket. |
|
READ NEXT:
 Inspection
INSPECTION PROCEDURE 1. INSPECT ENGINE COOLANT TEMPERATURE SENSOR *a Component without harness connected (Engine Coolant Temperature Sensor) *b Resistance *c Temperature *d Accepta
Installation
INSTALLATION CAUTION / NOTICE / HINT HINT: Perform "Inspection After Repairs" after replacing the engine coolant temperature sensor. Click here PROCEDURE 1. INSTALL ENGINE COOLANT TEMPERATURE SENSOR
Heated Oxygen Sensor
ComponentsCOMPONENTS ILLUSTRATION *1 FRONT EXHAUST PIPE SUB-ASSEMBLY *2 HEATED OXYGEN SENSOR *3 COMPRESSION SPRING *4 GASKET N*m (kgf*cm, ft.*lbf): Specified torque * F
SEE MORE:
Left Low Beam Fan Malfunction (B243D,B243E)
DESCRIPTION This DTC is output when the low beam fan is malfunctioning and the low beam illumination is dark. The headlight ECU sub-assembly LH outputs DTC B243D and B243E DTC No. Detection Item DTC Detection Condition Trouble Area B243D Left Low Beam Fan Malfunction The headlight a
Parts Location
PARTS LOCATION ILLUSTRATION *1 OUTER REAR VIEW MIRROR ASSEMBLY LH *2 OUTER REAR VIEW MIRROR ASSEMBLY RH *3 OUTER MIRROR LH *4 OUTER MIRROR RH *5 NO. 2 ENGINE ROOM RELAY BLOCK - DEF RELAY - ECU-B NO.2 FUSE - DEF FUSE - MIR HTR FUSE - MIRROR FUSE *6 FUSE BLOCK ASSEMBLY -
© 2016-2026 Copyright www.lexunx.com
