
Lexus NX: Inspection
INSPECTION
PROCEDURE
1. INSPECT FRONT SEAT INNER BELT ASSEMBLY LH
(a) Measure the resistance according to the value(s) in the table below.
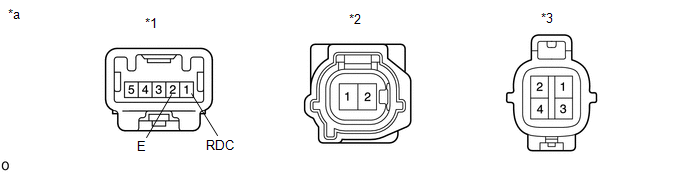
| *1 | Connector A | *2 | Connector B |
| *3 | Connector C | - | - |
| *a | Component without harness connected (Front Seat Inner Belt Assembly LH) | - | - |
Standard Resistance:
| Tester Connection | Condition | Specified Condition |
|---|---|---|
| A-1 (RDC) - A-2 (E) | Front seat belt unfastened | 10 kΩ or higher |
| Front seat belt fastened | Below 1 Ω | |
| B-1 - C-3 B-2 - C-4 | Always | Below 1 Ω |
If the result is not as specified, replace the front seat inner belt assembly LH.
2. INSPECT FRONT SEAT INNER BELT ASSEMBLY RH
(a) Measure the resistance according to the value(s) in the table below.

| *1 | Connector A | *2 | Connector B |
| *a | Component without harness connected (Front Seat Inner Belt Assembly RH) | - | - |
Standard Resistance:
| Tester Connection | Condition | Specified Condition |
|---|---|---|
| A-1 (RDC) - A-2 (E) | Front passenger seat belt unfastened | 10 kΩ or higher |
| Front passenger seat belt fastened | Below 1 Ω |
If the result is not as specified, replace the front seat inner belt assembly RH.
READ NEXT:
 Installation
INSTALLATION PROCEDURE 1. INSTALL FRONT SEAT INNER BELT ASSEMBLY LH (a) Install the front seat belt anchor plate. (b) Install the front seat inner belt assembly LH with the nut. Torque: 42 N·m {4
Precaution
PRECAUTION CAUTION: Replace any faulty parts of the seat belt systems (outer belt, inner belt, bolts, nuts, adjustable shoulder anchor, tether anchor hardware and other related parts). When inspecting
SEE MORE:
Front Passenger Side Power Window does not Operate with Front Passenger Side Power Window Switch
DESCRIPTION When the power switch is on (IG), the front power window regulator motor assembly RH is operated by the power window regulator switch assembly. The front power window regulator motor assembly RH has motor, regulator and ECU functions. WIRING DIAGRAM CAUTION / NOTICE / HINT NOTICE:
Th
Installation
INSTALLATION PROCEDURE 1. INSTALL AIR CONDITIONING THERMISTOR ASSEMBLY (HUMIDITY SENSOR) *1 Stopper *2 Bracket (a) Attach the 2 brackets, and carefully install the air conditioning thermistor assembly (humidity sensor) to the glass surface, preventing air bubbles from forming between
