Lexus NX: Inspection
INSPECTION
PROCEDURE
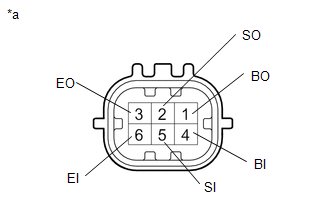
1. INSPECT FRONT CENTER ULTRASONIC SENSOR
| (a) Measure the resistance according to the value(s) in the table below. Standard Resistance:
If the result is not as specified, replace the front center ultrasonic sensor. |
|

2. INSPECT FRONT CORNER ULTRASONIC SENSOR
| (a) Measure the resistance according to the value(s) in the table below. Standard Resistance:
If the result is not as specified, replace the front corner ultrasonic sensor. |
|
READ NEXT:
 Installation
INSTALLATION PROCEDURE 1. INSTALL ULTRASONIC SENSOR CUSHION SET HINT: Perform the following procedure only when replacement of a ultrasonic sensor cushion set is necessary. (a) Install the ultrasonic
Components
COMPONENTS ILLUSTRATION *A w/ Hands Free Power Back Door - - *1 NO. 2 LUGGAGE ROOM WIRE *2 REAR CENTER ULTRASONIC SENSOR *3 REAR CENTER ULTRASONIC SENSOR RETAINER *4 REAR
SEE MORE:
Removal
REMOVAL PROCEDURE 1. TABLE OF BOLT, SCREW AND CLIP HINT: All bolts, screws, and clips relevant to installing and removing the instrument panel are shown along with their alphabet code in the table below. 2. DISABLE AUTOAWAY/RETURN FUNCTION (for Power Tilt and Power Telescopic Steering Column) (a) D
Replacement
REPLACEMENT CAUTION / NOTICE / HINT CAUTION:
Prolonged and repeated contact with engine oil will result in the removal of natural oils from the skin, leading to dryness, irritation and dermatitis. In addition, used engine oil contains potentially harmful contaminants which may cause skin cancer.
