Lexus NX: Inspection
Lexus NX Service Manual / Drivetrain / Drive Shaft / Propeller Shaft / Front Drive Shaft Assembly / Inspection
INSPECTION
CAUTION / NOTICE / HINT
NOTICE:
- When using a vise, place aluminum plates between the part and vise.
- When using a vise, do not overtighten it.
PROCEDURE
1. INSPECT FRONT DRIVE SHAFT ASSEMBLY
| (a) Check that there is no excessive play in the radial direction of the inboard joint and outboard joint. |
|
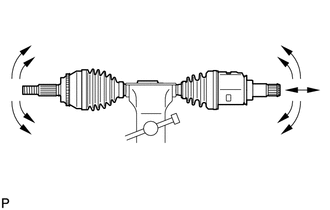
(b) Check the front axle inboard joint boot and front axle outboard joint boot for damage.
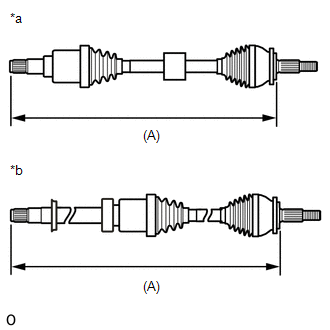
| (c) Check that the front axle inboard joint boot and front axle outboard joint boot are not stretched or contracted when the front drive shaft assembly is at the standard length. Length (A):
NOTICE: Keep the front drive shaft assembly level during inspection. If the front axle inboard joint boot and front axle outboard joint boot are stretched or contracted, correct them. |
|
READ NEXT:
 Reassembly
REASSEMBLY CAUTION / NOTICE / HINT NOTICE:
When using a vise, place aluminum plates between the part and vise.
When using a vise, do not overtighten it.
PROCEDURE 1. INSTALL FRONT DRIVE SHAFT
Installation
INSTALLATION PROCEDURE 1. INSTALL FRONT DRIVE SHAFT HOLE SNAP RING LH (a) Install a new front drive shaft hole snap ring LH. NOTICE:
Do not damage the spline of the front drive inboard joint assemb
SEE MORE:
Sensor Frozen Indication (Dirty or Frozen)
DESCRIPTION When the ultrasonic sensor is dirty or frozen, "Parking Assist Unavailable Clean Parking Assist Sensor" is displayed on the multi-information display in the combination meter assembly. PROCEDURE 1. CHECK FOR DTC (a) Clear the DTCs. Click here Body Electrical > Advanced Park
On-vehicle Inspection
ON-VEHICLE INSPECTION CAUTION / NOTICE / HINT CAUTION: Be sure to follow the correct removal and installation procedures of the airbag ECU assembly. PROCEDURE 1. INSPECT AIRBAG ECU ASSEMBLY (for Vehicle not Involved in Collision) (a) Perform a diagnostic system check. Click here 2. INSPECT AIRBAG
© 2016-2026 Copyright www.lexunx.com
