Lexus NX: Installation
Lexus NX Service Manual / Engine & Hybrid System / Cruise Control / Cruise Control Main Switch / Installation
INSTALLATION
PROCEDURE
1. INSTALL CRUISE CONTROL MAIN SWITCH
(a) Pass the wire harness under the rib as shown in the illustration.
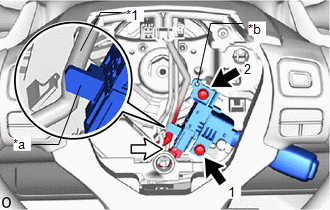
| *1 | Wire Harness |
| *a | Rib |
| *b | Guide |
.png) | Connector |
.png) | Screw |
(b) Attach the guide.
(c) Temporarily install the cruise control main switch with the 2 screws.
(d) Tighten the 2 screws to install the cruise control main switch.
HINT:
Tighten the screws in the order shown in the illustration.
Torque:
2.4 N·m {24 kgf·cm, 21 in·lbf}
(e) Connect the connector.
2. INSTALL HORN BUTTON ASSEMBLY
Click here .gif)
READ NEXT:
 Precaution
PRECAUTION HANDLING PRECAUTION FOR DYNAMIC RADAR CRUISE CONTROL SYSTEM Keep in mind the following points when servicing vehicles equipped with the dynamic radar cruise control system. (a) The dynamic
Parts Location
PARTS LOCATION ILLUSTRATION *1 FORWARD RECOGNITION CAMERA *2 MILLIMETER WAVE RADAR SENSOR ASSEMBLY *3 BRAKE BOOSTER WITH MASTER CYLINDER ASSEMBLY - SKID CONTROL ECU *4 PARKING BRAK
SEE MORE:
Data List / Active Test
DATA LIST / ACTIVE TEST DATA LIST HINT: Using the Techstream to read the Data List allows the values or states of switches, sensors, actuators and other items to be read without removing any parts. This non-intrusive inspection can be very useful because intermittent conditions or signals may be dis
Vehicle Control History
VEHICLE CONTROL HISTORY CHECK THE VEHICLE CONTROL HISTORY (LIGHTING SYSTEM) HINT:
The vehicle control history data (lighting system) stores the history of the reject function and system protection operations.
The number of occurrences, date and distance are stored in batches for each item.
(
© 2016-2026 Copyright www.lexunx.com
