Lexus NX: Installation
INSTALLATION
PROCEDURE
1. INSTALL FUEL LID WITH MOTOR LOCK ASSEMBLY
(a) Connect the connector.
(b) Install the fuel lid with motor lock assembly.
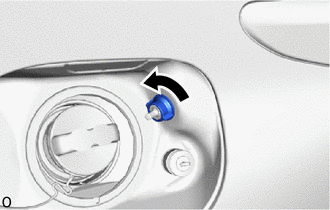
2. INSTALL FUEL FILLER OPENING LID LOCK RETAINER
| (a) Install the fuel filler opening lid lock retainer as shown in the illustration. |
|
3. INSTALL DECK TRIM SIDE PANEL ASSEMBLY LH
Click here .gif)
4. INSTALL NO. 1 LUGGAGE COMPARTMENT TRIM HOOK
Click here
5. INSTALL LUGGAGE HOLD BELT STRIKER ASSEMBLY
Click here
6. INSTALL ROPE HOOK ASSEMBLY
Click here
7. INSTALL UPPER DECK TRIM SIDE BOARD LH
Click here
8. INSTALL REAR DOOR OPENING TRIM WEATHERSTRIP LH
Click here
9. INSTALL REAR FLOOR FINISH PLATE
Click here
10. INSTALL REAR SEAT ASSEMBLY
(a) for Power Seat:
Click here
(b) for Manual Seat:
Click here
READ NEXT:
 Parts Location
PARTS LOCATION ILLUSTRATION *A w/ Power Back Door System *B w/o Power Back Door System *1 DOOR CONTROL SWITCH *2 MULTIPLEX NETWORK MASTER SWITCH ASSEMBLY *3 FRONT DOOR LOCK A
System Diagram
SYSTEM DIAGRAM
SEE MORE:
Removal
REMOVAL CAUTION / NOTICE / HINT CAUTION: Wear protective gloves. Sharp areas on the parts may injure your hands. PROCEDURE 1. REMOVE NO. 3 DECK BOARD SUB-ASSEMBLY Click here 2. REMOVE REAR DECK FLOOR BOX Click here 3. REMOVE DECK FLOOR BOX LH Click here 4. PRECAUTION CAUTION: Be sure to read P
Parts Location
PARTS LOCATION ILLUSTRATION *1 ENGINE ROOM RELAY BLOCK
- AM2 FUSE
*2 WIRELESS DOOR LOCK BUZZER *3 DOOR CONTROL RECEIVER - - ILLUSTRATION *A w/o Power Back Door System *B w/ Power Back Door System *1 BACK DOOR COURTESY LIGHT SWITCH ASSEMBLY *2 BACK DOO
