Lexus NX: Installation
INSTALLATION
CAUTION / NOTICE / HINT
CAUTION:
Wear protective gloves. Sharp areas on the parts may injure your hands.
HINT:
- Use the same procedure for the RH and LH sides.
- The procedure listed below is for the LH side.
PROCEDURE
1. INSTALL FRONT SEAT ASSEMBLY LH
(a) Place the front seat assembly in the cabin.
NOTICE:
- 2 or more people are required when inserting the front seat assembly into the vehicle.
- Be careful not to damage the vehicle body.
HINT:
for Driver Side:
When placing the front seat assembly into the vehicle, pass it through under the steering wheel.
(b) for Driver Side:
(1) Connect the connector to the front seat airbag assembly under the front seat assembly.
-
Before connecting the connector, check that the position of the housing lock is correct as shown in the illustration.
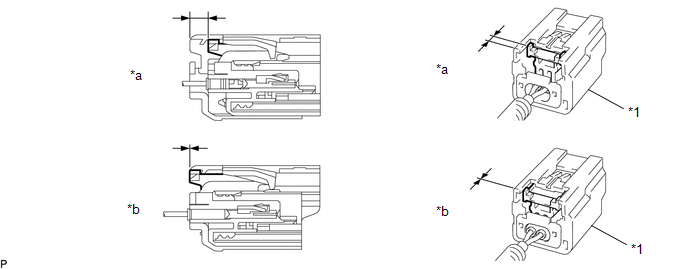
*1
Yellow CPA
-
-
*a
Correct
*b
Incorrect
-
Hold the sides of the yellow CPA and push in the connector in the direction indicated by the arrow until a click sound is heard to connect the connector.
NOTICE:
- Be careful not to damage the side airbag connector or wire harness.
- When connecting the connector, make sure to push it straight in.
- Do not hold any parts other than the yellow CPA when connecting the connector.
- If the upper portion of the yellow CPA is held when connecting the connector, the partial connection prevention mechanism will not function due to deformation of the yellow CPA. Therefore, hold the sides of the yellow CPA.
(c) Connect the 2 connectors.
(d) Attach the 2 clamps to connect the wire harness.
(e) for Front Passenger Side:
(1) Connect the connector to the front seat airbag assembly under the front seat assembly.
-
Before connecting the connector, check that the position of the housing lock is correct as shown in the illustration.
*c
Yellow CPA
-
-
*a
Correct
*b
Incorrect
-
Hold the sides of the yellow CPA and push in the connector in the direction indicated by the arrow until a click sound is heard to connect the connector.
NOTICE:
- Be careful not to damage the side airbag connector or wire harness.
- When connecting the connector, make sure to push it straight in.
- Do not hold any parts other than the yellow CPA when connecting the connector.
- If the upper portion of the yellow CPA is held when connecting the connector, the partial connection prevention mechanism will not function due to deformation of the yellow CPA. Therefore, hold the sides of the yellow CPA.
(2) Connect the connector of the front seat airbag assembly RH.
(f) Connect the 2 connectors.
(g) Attach the 2 clamps to connect the wire harness.
(h) Align the pin of the front seat adjuster assembly with the hole in the vehicle.
(i) Temporarily install the front seat assembly with the 4 bolts.
(j) Connect the cable to the auxiliary battery negative (-) terminal.
(1) Connect the cable to the auxiliary battery negative (-) terminal and tighten the nut.
Torque:
5.4 N·m {55 kgf·cm, 48 in·lbf}
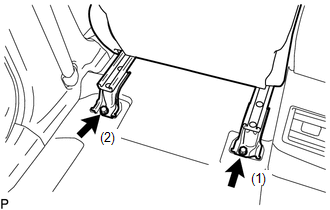
(k) Operate the front power seat switch LH (slide switch) to move the seat to the rearmost position.
| (l) Tighten the 2 bolts in the order indicated in the illustration. Torque: 37 N·m {377 kgf·cm, 27 ft·lbf} |
|
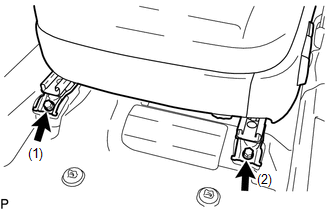
(m) Operate the front power seat switch LH (slide switch) to move the seat to the foremost position.
| (n) Tighten the 2 bolts in the order indicated in the illustration. Torque: 37 N·m {377 kgf·cm, 27 ft·lbf} |
|
2. INSTALL FRONT SEAT REAR INNER TRACK COVER LH
(a) Attach the 2 claws to install the front seat rear inner track cover LH.
3. INSTALL FRONT SEAT REAR OUTER TRACK COVER LH
(a) Attach the 2 claws to install the front seat rear outer track cover LH.
4. INSTALL FRONT SEAT INNER TRACK BRACKET COVER LH
(a) Operate the front power seat switch LH (slide switch) to move the seat to the rearmost position.
(b) Attach the 2 claws to install the front seat inner track bracket cover LH.
5. INSTALL FRONT SEAT OUTER TRACK BRACKET COVER LH
(a) Attach the 2 claws to install the front seat outer track bracket cover LH.
6. INSTALL FRONT SEAT HEADREST ASSEMBLY
(a) Install the front seat headrest assembly.
7. INSTALL DECK FLOOR BOX LH
Click here .gif)
8. INSTALL REAR DECK FLOOR BOX
Click here
9. INSTALL NO. 3 DECK BOARD SUB-ASSEMBLY
Click here
10. INITIALIZATION AFTER RECONNECTING AUXILIARY BATTERY TERMINAL
Click here
HINT:
When disconnecting and reconnecting the auxiliary battery, there is an automatic learning function that completes learning when the respective system is used.
Click here
11. CHECK SRS WARNING LIGHT
Click here
12. INSPECT FRONT POWER SEAT CONTROL SYSTEM
(a) w/ Memory:
Click here
(b) w/o Memory:
Click here
13. INSPECT CLIMATE CONTROL SEAT SYSTEM (w/ Climate Control Seat System)
Click here
14. INSPECT SEAT HEATER SYSTEM (w/ Seat Heater System)
Click here
READ NEXT:
 Components
COMPONENTS ILLUSTRATION *A for Driver Side *B for Front Passenger Side *1 FRONT INNER SEAT CUSHION SHIELD LH *2 FRONT LOWER SEAT CUSHION SHIELD *3 FRONT SEAT CUSHION SHIELD L
Removal
REMOVAL CAUTION / NOTICE / HINT CAUTION: Wear protective gloves. Sharp areas on the parts may injure your hands. HINT:
Use the same procedure for the RH and LH sides.
The procedure listed below i
SEE MORE:
Precaution
PRECAUTION PRECAUTION FOR DISCONNECTING CABLE FROM NEGATIVE AUXILIARY BATTERY TERMINAL NOTICE:
After the power switch is turned off, there may be a waiting time before disconnecting the negative (-) auxiliary battery terminal.
Click here
When disconnecting and reconnecting the auxiliary batte
Inspection
INSPECTION PROCEDURE 1. INSPECT HV BATTERY JUNCTION BLOCK ASSEMBLY (a) Inspect SMRB: (1) Measure the resistance according to the value(s) in the table below. Standard Resistance: Tester Connection Condition Specified Condition x2-1 (+) - t5-1 (CBI) Auxiliary battery voltage not appl
