Lexus NX: Lubrication System
On-vehicle Inspection
ON-VEHICLE INSPECTION
PROCEDURE
1. INSPECT ENGINE OIL LEVEL
(a) Put the engine in inspection mode (maintenance mode).
Click here .gif)
(b) Warm up and stop the engine 5 minutes later, insert the engine oil level dipstick and check that the engine oil level is between the L and F marks. If the engine oil level is low, check for leaks and fill up to the F mark.
NOTICE:
Do not add engine oil above the F mark.
HINT:
A certain amount of engine oil will be consumed while driving. In the following situations, engine oil consumption may increase, and engine oil may need to be refilled in between oil maintenance intervals.
- When the engine is new, for example directly after purchasing the vehicle or after replacing the engine.
- If low quality engine oil or oil of an inappropriate viscosity is used.
- When driving at high engine speed or with a heavy load, when towing, or when driving while accelerating or decelerating frequently.
- When leaving the engine idling for a long time, or when driving frequently through heavy traffic.
When judging the amount of oil consumption, keep in mind that the oil may have become diluted, making it difficult to judge the true level accurately.
2. INSPECT ENGINE OIL QUALITY
(a) Check the engine oil for deterioration, water contamination, discoloration or thinning. If the quality is visibly poor, replace the engine oil and oil filter element.
Click here
3. INSPECT OIL PRESSURE
NOTICE:
Before and after measurement, clean equipment and hoses.
(a) Remove the engine oil pressure switch assembly.
Click here
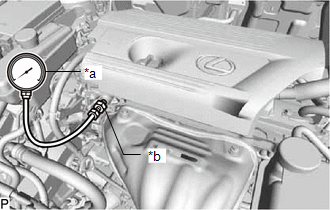
| (b) Install an oil pressure gauge with the adapter. |
|
(c) Put the engine in inspection mode (maintenance mode).
Click here
(d) Warm up the engine.
(e) Measure the oil pressure, and check that it is within the standard range.
Standard Engine Oil Pressure:
| Condition | Specified Condition |
|---|---|
| 1000 rpm | 145 kPa (1.5 kgf/cm2, 21 psi) or higher |
| 2500 rpm | 340 kPa (3.5 kgf/cm2, 49 psi) or higher |
If the result is not as specified, check the quality of the engine oil and check the oil paths for clogging. Repair or replace if necessary. If the engine oil pressure is still not as specified, replace the timing chain cover sub-assembly.
HINT:
Replace the timing chain cover sub-assembly as the engine oil pump is built into the timing chain cover sub-assembly.
(f) Remove the oil pressure gauge and adapter.
(g) Install the engine oil pressure switch assembly.
Click here
READ NEXT:
 Components
COMPONENTS ILLUSTRATION *1 OIL FILTER CAP ASSEMBLY *2 O-RING *3 GASKET *4 OIL PAN DRAIN PLUG *5 OIL FILTER ELEMENT *6 OIL FILTER DRAIN PLUG *7 OIL FILLER CAP -
Replacement
REPLACEMENT CAUTION / NOTICE / HINT CAUTION:
Prolonged and repeated contact with engine oil will result in the removal of natural oils from the skin, leading to dryness, irritation and dermatitis.
SEE MORE:
Removal
REMOVAL PROCEDURE 1. REMOVE NO. 1 ENGINE UNDER COVER ASSEMBLY Click here 2. DRAIN COOLANT (for Inverter Coolant) Click here 3. REMOVE NO. 2 MOTOR WATER JACKET COVER ASSEMBLY (a) Remove the 5 bolts. (b) Insert the blade of an oil pan seal cutter between the transaxle housing. Cut
Seat Heater for Front Left Seat does not Operate
DESCRIPTION When the seat heater switch on air conditioning control assembly is operated, the air conditioning amplifier assembly receives the signal. The air conditioning amplifier assembly receives the signal and operates the front seat heater. WIRING DIAGRAM CAUTION / NOTICE / HINT NOTICE:
If
