- Engine not running
- 30 seconds after power switch turned on (IG)
Lexus NX: Mass Air Flow Meter
Components
COMPONENTS
ILLUSTRATION
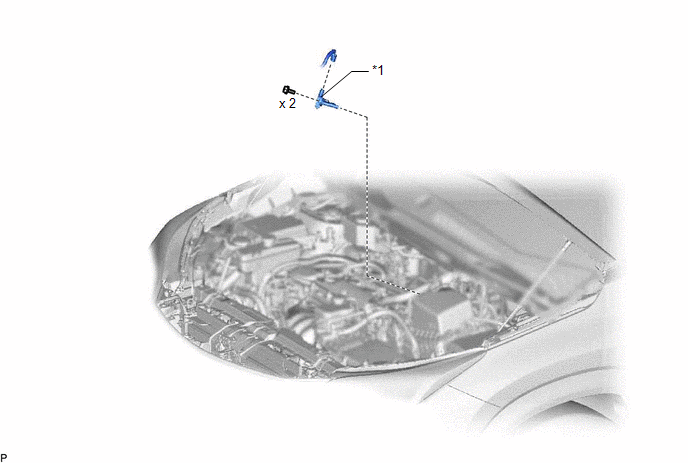
| *1 | MASS AIR FLOW METER SUB-ASSEMBLY | - | - |
On-vehicle Inspection
ON-VEHICLE INSPECTION
CAUTION / NOTICE / HINT
NOTICE:
- Perform the mass air flow meter sub-assembly inspection according to the procedures below.
- Only replace the mass air flow meter sub-assembly when the mass air flow value in the Data List (with the engine stopped) is not within the normal operating range or there is foreign matter on the mass air flow meter platinum hot wire (heater).
PROCEDURE
1. INSPECT MASS AIR FLOW METER SUB-ASSEMBLY
NOTICE:
- Perform the inspection with the vehicle indoors and on a level surface.
- Perform the inspection of the mass air flow meter sub-assembly while it is installed to the air cleaner cap sub-assembly (installed to the vehicle).
- During the test, do not use an exhaust air duct on the exhaust pipe.
HINT:
Perform "Inspection After Repairs" after replacing the mass air flow meter sub-assembly.
Click here .gif)
(a) Connect the Techstream to the DLC3.
(b) Turn the power switch on (IG) (do not run the engine).
(c) Turn the Techstream on.
(d) Enter the following menus: Powertrain / Engine and ECT / Data List / MAF.
Powertrain > Engine and ECT > Data List| Tester Display |
|---|
| MAF |
(e) Wait 30 seconds, and then read the values on the Techstream.
Standard:
| Item | Condition | Specified Condition |
|---|---|---|
| MAF | | 0.58 gm/sec or less |
If the result is not as specified, replace the mass air flow meter sub-assembly.
If the result is as specified, inspect the mass air flow meter sub-assembly.
Click here
Removal
REMOVAL
PROCEDURE
1. REMOVE MASS AIR FLOW METER SUB-ASSEMBLY
| (a) Disconnect the mass air flow meter sub-assembly connector. |
|
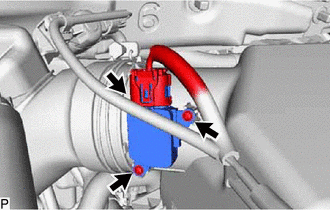
(b) Remove the 2 screws and mass air flow meter sub-assembly.
Inspection
INSPECTION
PROCEDURE
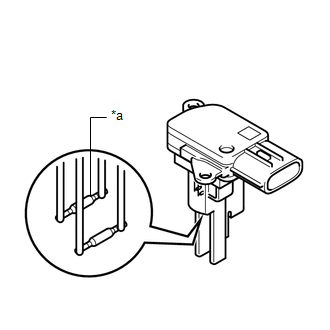
1. INSPECT MASS AIR FLOW METER SUB-ASSEMBLY
| (a) Perform a visual check for any foreign matter on the platinum hot wire (heater) of the mass air flow meter sub-assembly as shown in the illustration. OK: There is no foreign matter. |
|
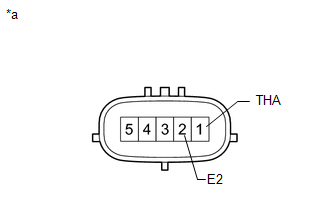
(b) Check the intake air temperature sensor (built into the mass air flow meter sub-assembly).
| (1) Measure the resistance according to the value(s) in the table below. Standard Resistance:
If the result is not as specified, replace the mass air flow meter sub-assembly. |
|
Installation
INSTALLATION
CAUTION / NOTICE / HINT
HINT:
Perform "Inspection After Repairs" after replacing the mass air flow meter sub-assembly.
Click here .gif)
PROCEDURE
1. INSTALL MASS AIR FLOW METER SUB-ASSEMBLY
HINT:
Perform "Inspection After Repairs" after replacing the mass air flow meter sub-assembly.
Click here
(a) Install the mass air flow meter sub-assembly with the 2 screws.
(b) Connect the mass air flow meter sub-assembly connector.
READ NEXT:
 Relay
Relay
On-vehicle InspectionON-VEHICLE INSPECTION PROCEDURE 1. INSPECT JUNCTION BLOCK *1 Main Body ECU - - *a Component without harness connected (Junction Block) *b Component without ma
Precaution
PRECAUTION INITIALIZATION NOTICE: Perform Registration (VIN registration) when replacing the ECM. Click here DISCONNECT CABLE FROM NEGATIVE AUXILIARY BATTERY TERMINAL NOTICE:
After the power swit
SEE MORE:
Dtc Check / Clear
DTC CHECK / CLEAR CHECK FOR DTC (a) Connect the Techstream to the DLC3. (b) Turn the power switch on (IG). (c) Turn the Techstream on. (d) Enter the following menus: Body Electrical / Main body / Trouble Codes. Body Electrical > Main Body > Trouble Codes (e) Enter the following menus: Body Ele
Reserve Lock Switch
ComponentsCOMPONENTS ILLUSTRATION *1 DOOR CONTROL SWITCH *2 PULL HANDLE RemovalREMOVAL PROCEDURE 1. REMOVE PULL HANDLE Click here 2. REMOVE DOOR CONTROL SWITCH (a) Detach the 2 claws and remove the door control switch. InspectionINSPECTION PROCEDURE 1. INSPECT DOOR C
© 2016-2026 Copyright www.lexunx.com
