Lexus NX: Operation Check
OPERATION CHECK
INSPECT DRIVER SIDE SEAT BELT WARNING LIGHT
HINT:
The front seat belt warning light on the combination meter assembly is used for both the driver side seat and front passenger side seat.
(a) Turn the power switch on (IG).
(b) When the driver seat belt is not fastened, check that the seat belt warning light on the combination meter assembly blinks for 6 seconds.
After 1.8 seconds, check that the seat belt warning light on the combination meter assembly changes from blinking to illuminated.
(c) Lift up the vehicle using a swing arm type lift.
Click here .gif)
(d) Start the hybrid control system.
(e) Check the state of the seat belt warning light on the combination meter assembly under the following conditions:
-
Step 1:
When the driver seat belt is not fastened, the shift lever is in any position other than P and the parking brake is released for 24 seconds or more, check that the seat belt warning light on the combination meter assembly blinks.
-
Step 2:
When the driver seat belt is not fastened and the vehicle is driven at approximately 20 km/h (12 mph) or more, check that the seat belt warning light on the combination meter assembly blinks.
After 53.6 seconds, check that the seat belt warning light on the combination meter assembly changes from blinking to illuminated.
-
Step 3:
Starting from step 1 with the seat belt warning light on the combination meter assembly blinking, move the shift lever to P, and then check that the seat belt warning light on the combination meter assembly changes from blinking to illuminated.
-
Step 4:
Starting from step 1 with the seat belt warning light on the combination meter assembly blinking, apply the parking brake, and then check that the seat belt warning light on the combination meter assembly changes from blinking to illuminated.
-
Step 5:
Starting from step 1 with the seat belt warning light on the combination meter assembly blinking, fasten the driver seat belt, and then check that the seat belt warning light on the combination meter assembly turns off.
INSPECT FRONT PASSENGER SIDE SEAT BELT WARNING LIGHT
HINT:
The front seat belt warning light on the combination meter assembly is used for both the driver side seat and front passenger side seat.
(a) Turn the power switch on (IG).
(b) Place a weight of 20 kg (44.0 lb) on the front passenger seat.
NOTICE:
Place the weight on the seat cushion and allow it to come into contact with the seatback.
(c) Fasten the driver seat belt.
(d) When the front passenger seat belt is not fastened with the front passenger seat occupied, check that the seat belt warning light on the combination meter assembly blinks for 6 seconds.
After 1.8 seconds, check that the seat belt warning light on the combination meter assembly changes from blinking to illuminated.
(e) Lift up the vehicle using a swing arm type lift.
Click here
(f) Start the hybrid control system.
(g) Check the state of the seat belt warning light on the combination meter assembly under the following conditions:
-
Step 1:
When the front passenger seat belt is not fastened, the shift lever is in any position other than P and the parking brake is released for 24 seconds or more, check that the seat belt warning light on the combination meter assembly blinks.
-
Step 2:
When the front passenger seat belt is not fastened and the vehicle is driven at approximately 20 km/h (12 mph) or more, check that the seat belt warning light on the combination meter assembly blinks.
After 53.6 seconds, check that the seat belt warning light on the combination meter assembly changes from blinking to illuminated.
-
Step 3:
Starting from step 1 with the seat belt warning light on the combination meter assembly blinking, move the shift lever to P, and then check that the seat belt warning light on the combination meter assembly changes from blinking to illuminated.
-
Step 4:
Starting from step 1 with the seat belt warning light on the combination meter assembly blinking, apply the parking brake, and then check that the seat belt warning light on the combination meter assembly changes from blinking to illuminated.
-
Step 5:
Starting from step 1 with the seat belt warning light on the combination meter assembly blinking, the front passenger seat belt not fastened and the weight on the front passenger seat, check that the seat belt warning light on the combination meter assembly turns off when the weight is removed from the front passenger seat.
-
Step 6:
Starting from step 1 with the seat belt warning light on the combination meter assembly blinking, when the front passenger seat belt is fastened, check that the seat belt warning light on the combination meter assembly turns off.
INSPECT REAR SEAT BELT WARNING LIGHT
(a) Check the state of the rear seat belt warning light on the radio receiver assembly:
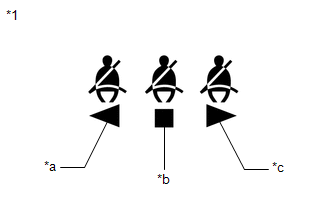
| *1 | Rear Seat Belt Warning Light (Air Conditioning Control Assembly) |
| *a | LH |
| *b | Center |
| *c | RH |
(1) Turn the power switch off.
(2) Open and then close either rear door.
(3) Turn the power switch on (IG).
(4) When a rear seat belt is not fastened, check that the rear seat belt warning light on the radio receiver assembly is illuminated.
(5) After 34 seconds, check that the rear seat belt warning light on the radio receiver assembly turns off.
(6) When one of the rear seat belts is unfastened from being fastened, check that the rear seat belt warning light on the radio receiver assembly illuminates.
INSPECT SEAT BELT WARNING BUZZER
HINT:
The seat belt warning buzzer can be customized. Make sure that this function is ON.
Click here
(a) for Front Seat Belt Warning Buzzer:
(1) Place a weight of 20 kg (44.0 lb) on the front passenger seat.
NOTICE:
Place the weight on the seat cushion and do not allow it to come into contact with the seatback.
(2) After turning the power switch on (IG), if the driver seat belt is not fastened within 1.8 seconds, check that the seat belt warning buzzer in the combination meter assembly sounds at 1.2 second intervals for 6 seconds.
(3) Lift up the vehicle using a swing arm type lift.
Click here
(4) Start the hybrid control system.
(5) When the driver or front passenger seat belt is not fastened and the vehicle is driven at approximately 20 km/h (12 mph) or more, check that the seat belt warning buzzer in the combination meter assembly sounds once.
(6) When 30 seconds have passed after the buzzer sounds, check that the seat belt warning buzzer in the combination meter assembly sounds at an interval of 1.2 second for 9.6 seconds.
(7) After the seat belt warning buzzer has been sounding for 9.6 seconds at an interval of 1.2 second, check that the seat belt warning buzzer in the combination meter assembly sounds at an interval of 0.4 seconds for 20 seconds.
(8) Check that the seat belt warning buzzer in the combination meter assembly stops 29.6 seconds after it started sounding at an interval of 1.2 second.
(9) After the seat belt warning buzzer in the combination meter assembly stops, the power switch is turned off and the hybrid control system is restarted, check that the buzzer sounds once again and then sounds according to the appropriate pattern when the vehicle is driven at 20 km/h (12 mph) or more with the driver or front passenger seat belt not fastened.
(10) After the seat belt warning buzzer in the combination meter assembly stops and the vehicle is driven at 20 km/h (12 mph) or more with the driver side or front passenger side seat belt fastened, when the driver side or front passenger side seat belt is unfastened, check that the buzzer sounds once again and then sounds according to the appropriate pattern.
(11) After the seat belt warning buzzer in the combination meter assembly stops sounding and the shift lever is moved to R and then back to D, when the vehicle is driven at 20 km/h (12 mph) or more with the driver side or front passenger side seat belt not fastened, check that the buzzer sounds once again and then sounds according to the appropriate pattern.
(b) for Rear Seat Belt Warning Buzzer:
(1) Open and close either rear door.
(2) Lift the vehicle using a swing arm type lift.
Click here
(3) Fasten the driver seat belt.
(4) Turn the power switch on (IG).
(5) Check that the seat belt warning buzzer in the combination meter assembly sounds at an interval of 1.2 seconds for 6 seconds.
(6) After the seat belt warning buzzer has been sounding for 6 seconds at an interval of 1.2 seconds, check that the seat belt warning buzzer in the combination meter assembly sounds at an interval of 0.4 seconds for 24 seconds.
(7) Check that the seat belt warning buzzer in the combination meter assembly stops 30 seconds after it started sounding at an interval of 1.2 seconds.
(8) After the buzzer has stopped, turn the power switch off, open and close a rear door and then start the hybrid control system again. Drive the vehicle at approximately 20 km/h (12 mph) or more while a rear seat belt is not fastened, and check that the buzzer sounds again.
(9) After the buzzer has stopped, fasten the rear seat belt. Drive the vehicle at approximately 20 km/h (12 mph) or more, unfasten a rear seat belt and check that the buzzer sounds again.
(10) After the buzzer has stopped, stop the vehicle, change the shift lever to R and then move it to D. Drive the vehicle at approximately 20 km/h (12 mph) or more, and check that the buzzer sounds again.
READ NEXT:
 Customize Parameters
CUSTOMIZE PARAMETERS CUSTOMIZE SEAT BELT WARNING SYSTEM HINT: The following items can be customized. NOTICE:
When the customer requests a change in a function, first make sure that the function can
Problem Symptoms Table
PROBLEM SYMPTOMS TABLE NOTICE: Before replacing the main body ECU (multiplex network body ECU), refer to the Smart Access System with Push-button Start (for Entry Function). Click here HINT:
Use
Terminals Of Ecu
TERMINALS OF ECU CHECK COMBINATION METER ASSEMBLY (a) Disconnect the I10 combination meter assembly connector. (b) Measure the resistance and voltage according to the value(s) in the table below.
SEE MORE:
Test Mode Procedure
TEST MODE PROCEDURE WARNING LIGHT AND INDICATOR LIGHT INITIAL CHECK (a) When the power switch is turned on (IG), check that the ABS warning, brake warning / red (malfunction), brake warning / yellow (minor malfunction), slip indicator, brake hold standby indicator and brake hold operated indicator l
Checking Monitor Status
CHECKING MONITOR STATUS The purpose of the monitor result (mode 06) is to allow access to the results of on-board diagnostic monitoring tests of specific components/systems that are not continuously monitored. Examples are catalysts and evaporative emissions (EVAP) systems. The monitor result allows
