Lexus NX: Parts Location
Lexus NX Service Manual / Vehicle Interior / Meter / Gauge / Display / Clock System / Parts Location
PARTS LOCATION
ILLUSTRATION
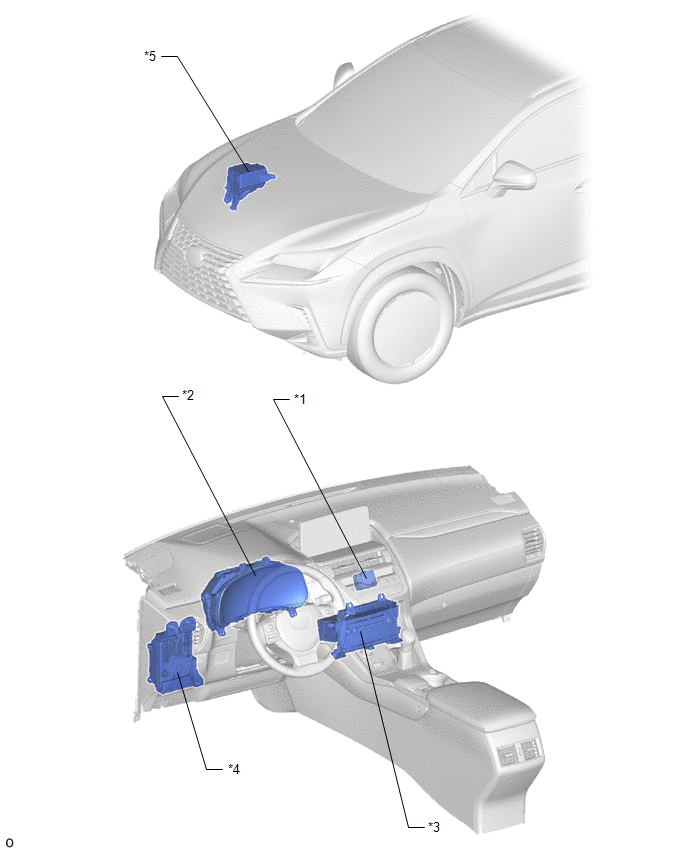
| *1 | CLOCK ASSEMBLY | *2 | COMBINATION METER ASSEMBLY |
| *3 | RADIO RECEIVER ASSEMBLY | *4 | INSTRUMENT PANEL JUNCTION BLOCK ASSEMBLY - ACC FUSE - PANEL FUSE |
| *5 | NO. 2 ENGINE ROOM RELAY BLOCK - ECU-B NO.1 FUSE | - | - |
READ NEXT:
 System Diagram
SYSTEM DIAGRAM
How To Proceed With Troubleshooting
CAUTION / NOTICE / HINT HINT:
Use the following procedures to troubleshoot the clock system.
*: Use the Techstream.
PROCEDURE 1. VEHICLE BROUGHT TO WORKSHOP
NEXT 2
Customize Parameters
CUSTOMIZE PARAMETERS CUSTOMIZING WITH MULTI-DISPLAY (a) Turn the power switch on (IG). (b) Time zone setting (1) Using the multi-display, select "Setup", "General", "Clock", and then time zone and cha
SEE MORE:
Components
COMPONENTS ILLUSTRATION *1 EXHAUST VALVE *2 EXHAUST VALVE GUIDE BUSH *3 INTAKE VALVE *4 INTAKE VALVE GUIDE BUSH *5 NO. 1 STRAIGHT SCREW PLUG *6 NO. 2 STRAIGHT SCREW PLUG *7 RING PIN *8 SPARK PLUG TUBE *9 VALVE SPRING SEAT *10 VALVE STEM OIL SEAL
Switch Operation of Remote Touch not Accepted
CAUTION / NOTICE / HINT NOTICE: When replacing the radio receiver assembly, always replace it with a new one. If a radio receiver assembly which was installed to another vehicle is used, the following may occur:
A communication malfunction DTC may be stored.
The radio receiver assembly may not
© 2016-2026 Copyright www.lexunx.com
