Lexus NX: Reassembly
REASSEMBLY
CAUTION / NOTICE / HINT
HINT:
- Use the same procedure for the RH and LH sides.
- The procedure listed below is for the LH side.
PROCEDURE
1. INSTALL FRONT DOOR UPPER OUTSIDE MOULDING PAD
(a) When using a new front door upper outside moulding sub-assembly LH:
(1) Clean the surface of the front door upper outside moulding sub-assembly LH.
(b) When reusing the front door upper outside moulding sub-assembly LH:
(1) Remove the double-sided tape from the front door upper outside moulding sub-assembly LH.
(2) Wipe off any tape adhesive residue with cleaner.
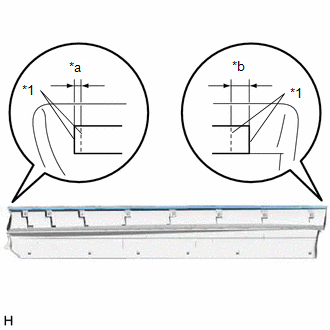
(c) Install a new front door upper outside moulding pad.
(1) Remove the peeling paper from the face of the front door upper outside moulding pad.
HINT:
After removing the peeling paper, keep the exposed adhesive free from foreign matter.
| (2) Install the front door upper outside moulding pad as shown in the illustration. |
|
READ NEXT:
 Installation
INSTALLATION CAUTION / NOTICE / HINT HINT:
Use the same procedure for the RH and LH sides.
The procedures listed below are for the LH side.
PROCEDURE 1. INSTALL FRONT DOOR LOWER OUTSIDE MOULDI
Components
COMPONENTS ILLUSTRATION *1 DECK FLOOR BOX LH *2 NO. 3 DECK BOARD SUB-ASSEMBLY *3 REAR DECK FLOOR BOX *4 NEGATIVE AUXILIARY BATTERY TERMINAL N*m (kgf*cm, ft.*lbf): Specified
SEE MORE:
Diagnostic Trouble Code Chart
DIAGNOSTIC TROUBLE CODE CHART CAN Communication System DTC No. Detection Item DTC Output from Link B1003 ECU Malfunction Central gateway ECU (network gateway ECU) U0199 Lost Communication with "Door Control Module A" Main Body U0200 Lost Communication with "D
PBD Unit Pulse Sensor LH Circuit (B2226)
DESCRIPTION This DTC is output when the multiplex network door ECU detects a power back door unit assembly set LH pulse malfunction. DTC No. Detection Item DTC Detection Condition Trouble Area B2226 PBD Unit Pulse Sensor LH Circuit Multiplex network door ECU detects power back door
