Lexus NX: Reassembly
REASSEMBLY
CAUTION / NOTICE / HINT
CAUTION:
Wear protective gloves. Sharp areas on the parts may injure your hands.
HINT:
- Use the same procedure for the RH and LH sides.
- The procedure listed below is for the LH side.
PROCEDURE
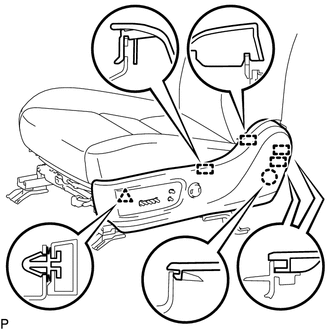
1. INSTALL FRONT SEAT WIRE LH (for Driver Side)
| (a) Attach the 5 clamps to install the front seat wire LH. |
|
.png)
(b) Attach the claw to connect the connector.
(c) Connect the 3 connectors.
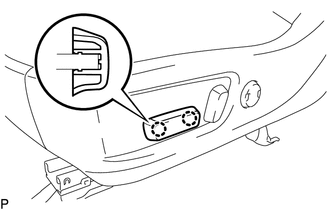
2. INSTALL FRONT SEAT WIRE RH (for Front Passenger Side)
| (a) Attach the 5 clamps to install the front seat wire RH. |
|
.png)
(b) Attach the claw to connect the connector.
(c) Connect the 3 connectors.
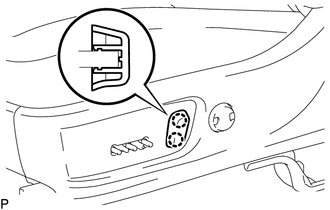
3. INSTALL FRONT SEAT WIRE RH (for Front Passenger Side)
| (a) Attach the 5 clamps to install the front seat wire RH. |
|
.png)
(b) Connect the 2 connectors.
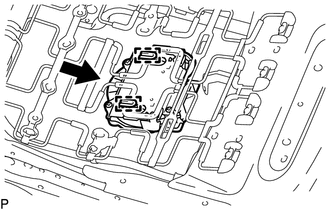
4. INSTALL OCCUPANT DETECTION ECU (for Front Passenger Side)
Click here .gif)
5. INSTALL SEAT HEATER CONTROL SUB-ASSEMBLY LH (w/ Seat Heater System)
(a) Attach the 2 clamps to install the seat heater control sub-assembly LH.
(b) Connect the connector.
6. INSTALL FRONT SEAT CUSHION SPRING SUB-ASSEMBLY LH
(a) Attach the 6 hooks to install the front seat cushion spring sub-assembly LH to the front seat adjuster assembly LH.
(b) w/ Climate Control Seat System:
(1) Attach the clamp to connect the wire harness.
7. INSTALL SEAT POSITION AIRBAG SENSOR (for Driver Side)
Click here
8. INSTALL SEAT CUSHION CLIMATE CONTROL BLOWER ASSEMBLY LH (w/ Climate Control Seat System)
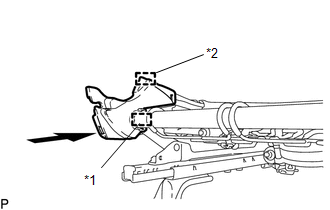
| (a) Attach the 2 hooks to install the seat cushion climate control blower assembly LH. |
|
(b) Connect the connector.
9. INSTALL SEAT CUSHION CLIMATE CONTROL BRACKET LH (w/ Climate Control Seat System)
(a) Using a T20 "TORX" socket wrench, install the seat cushion climate control bracket LH with the 2 "TORX" screws.
10. INSTALL SEAT CUSHION CLIMATE CONTROL DUCT LH (w/ Climate Control Seat System)
(a) Attach the 2 claws to install the seat cushion climate control duct LH to the seat cushion climate control blower assembly LH.
11. INSTALL FRONT SEAT CUSHION EDGE PROTECTOR LH
| (a) Attach the clamp and guide to install the front seat cushion edge protector LH. |
|
12. INSTALL FRONT SEAT CUSHION EDGE PROTECTOR RH
HINT:
Use the same procedure described for the LH side.
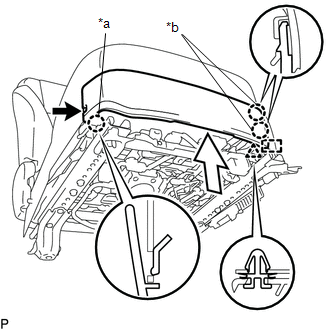
13. INSTALL FRONT LOWER SEAT CUSHION SHIELD LH
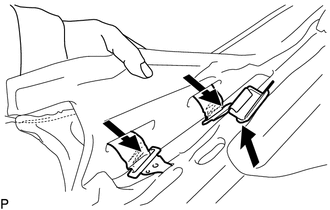
| (a) Attach the clip A to install the front lower seat cushion shield LH. |
|
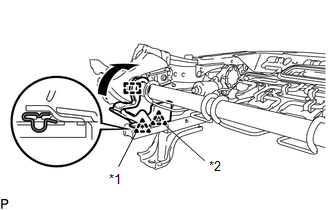
(b) Attach the hook in the direction indicated by the arrow in the illustration.
(c) Install the clip B.
14. INSTALL FRONT LOWER SEAT CUSHION SHIELD RH
| (a) Attach the clip to install the front lower seat cushion shield RH. |
|
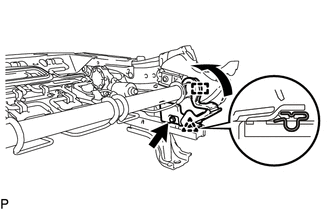
(b) Attach the hook in the direction indicated by the arrow in the illustration.
(c) Install the screw.
15. INSTALL FRONT SEAT CUSHION AIRBAG ASSEMBLY RH (for Front Passenger Side)
Click here
16. INSTALL LUMBAR SUPPORT ADJUSTER ASSEMBLY LH
Click here
17. INSTALL FRONT SEATBACK SPRING SUB-ASSEMBLY RH (for Front Passenger Side)
(a) Attach the 2 hooks to install the front seatback spring sub-assembly RH to the front seatback frame sub-assembly RH.
18. INSTALL FRONT SEATBACK EDGE PROTECTOR
(a) Attach the 2 claws and 4 guides to install the 2 front seatback edge protectors.
19. INSTALL FRONT NO. 1 SEATBACK HOOK
(a) Install the 2 front No. 1 seatback hooks to the lumbar support adjuster assembly LH.
(b) Attach the 2 claws.
20. INSTALL SEPARATE TYPE FRONT SEATBACK SPRING ASSEMBLY LH
(a) Attach the 4 guides to install the separate type front seatback spring assembly LH to the front seat adjuster assembly LH.
(b) Install the 4 bolts.
Torque:
42 N·m {428 kgf·cm, 31 ft·lbf}
21. INSTALL SEATBACK CLIMATE CONTROL BLOWER LH (w/ Climate Control Seat System)
(a) Attach the 4 hooks to install the seatback climate control blower LH.
(b) Install the clip.
22. INSTALL FRONT NO. 2 SEAT WIRE LH (for Driver Side)
(a) w/ Climate Control Seat System:
| (1) Attach the 8 clamps to install the front No. 2 seat wire LH. |
|
.png)
(2) Connect the 4 connectors.
| (b) w/o Climate Control Seat System: (1) Attach the 4 clamps to install the front No. 2 seat wire LH. (2) Connect the 3 connectors. |
|
.png)
23. INSTALL FRONT NO. 2 SEAT WIRE RH (for Front Passenger Side)
(a) w/ Climate Control Seat System:
| (1) Attach the 7 clamps to install the front No. 2 seat wire RH. |
|
.png)
(2) Connect the 3 connectors.
| (b) w/o Climate Control Seat System: (1) Attach the 2 clamps to install the front No. 2 seat wire RH. (2) Connect the 2 connectors. |
|
.png)
24. INSTALL FRONT SEAT AIRBAG ASSEMBLY LH
Click here
25. INSTALL SEATBACK FELT
(a) Install the seatback felt to the separate type front seatback spring assembly LH.
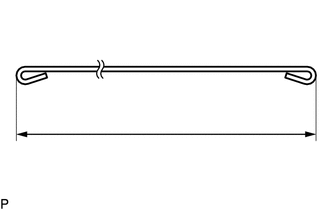
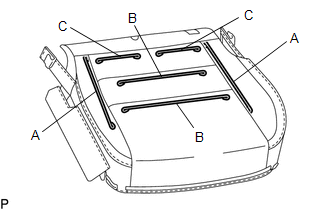
26. INSTALL SEAT COVER WIRE
(a) Install the seat cover wire.
HINT:
- Wire 1000 mm (3.28 ft.) or longer and shaped wire are available as supplied parts.
- For wire 1000 mm (3.28 ft.) or less in length, cut or shape 1000 mm (3.28 ft.) wire into the dimensions shown in the illustration.
-
Make sure to read the precautions before preparing the wire.
Click here

Length:
| A | 160 mm (6.29 in.) | B | 150 mm (5.91 in.) |
| C | 400 mm (1.31 ft.) | - | - |
HINT:
The dimensions shown in the illustration are the lengths.
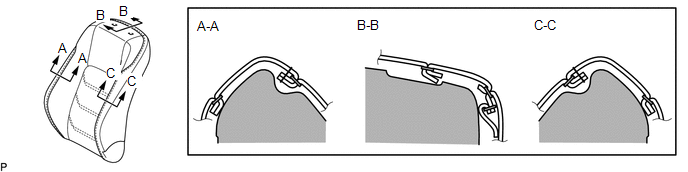
27. INSTALL SEPARATE TYPE FRONT SEATBACK COVER LH
HINT:
-
When installing the seat cover, refer to the precautions in order to prevent wrinkles from forming.
Click here
-
Align the seam allowance in a single direction as shown in the illustration.
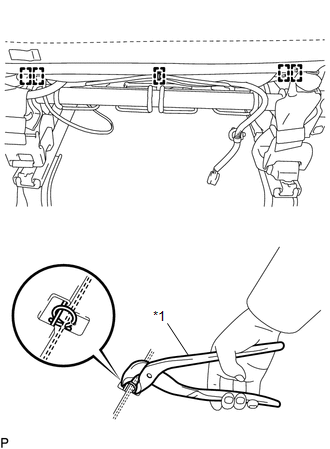
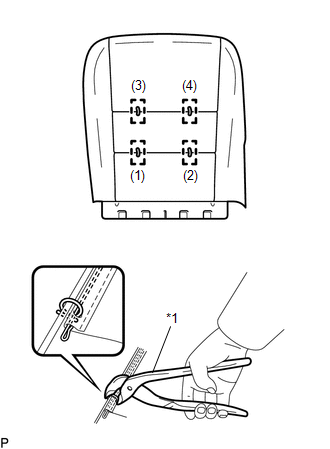
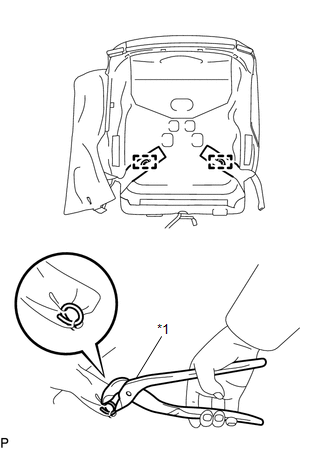
(a) Using hog ring pliers, install the separate type front seatback cover LH to the separate type front seatback pad LH with 14 new hog rings in the order indicated in the illustration.
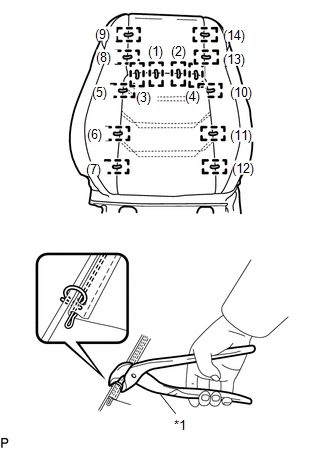
| *1 | Hog Ring Pliers |
NOTICE:
- Be careful not to damage the separate type front seatback cover.
- Be sure to securely install the hog rings as shown in the illustration while preventing wrinkles from forming on the separate type front seatback cover.
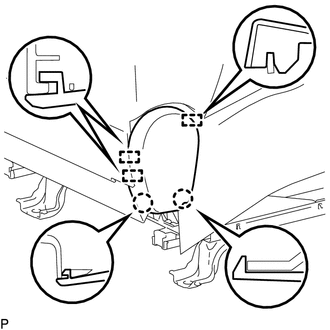
| (1) Pass the 3 seatback cover brackets through the 3 holes of the separate type front seatback pad. NOTICE: After the seatback cover bracket is installed, make sure the seatback cover bracket is not twisted. |
|
28. INSTALL SEPARATE TYPE FRONT SEATBACK COVER WITH PAD
(a) Temporarily install the separate type front seatback cover with pad.
(b) w/ Climate Control Seat System:
(1) Attach the 2 claws to connect the duct of the seatback climate control blower.
(c) Connect the 3 seatback cover brackets with the 2 nuts.
Torque:
5.5 N·m {56 kgf·cm, 49 in·lbf}
NOTICE:
- For vehicles with a front seat airbag assembly, the separate type front seatback cover with pad must be securely installed. Otherwise, the front seat airbag assembly may not deploy properly.
- Make sure that the strap is not twisted after installing the nut.
- Install the brackets securely.
29. INSTALL FRONT SEAT HEADREST SUPPORT
| (a) Align the protruding portion of the front seat headrest support with the installation groove of the front seatback spring assembly LH. |
|
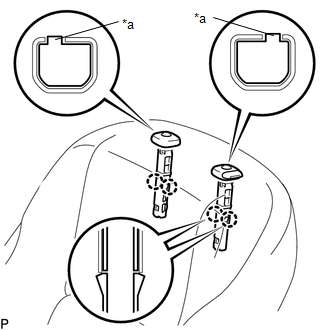
(b) Attach the 4 claws to install the 2 front seat headrest supports.
| (c) Close the 2 fasteners. |
|
| (d) Using hog ring pliers, install 5 new hog rings. NOTICE:
|
|
(e) Attach the 2 pieces of fastening tape and store the 2 fasteners.
30. INSTALL SEAT COVER WIRE
(a) Install the seat cover wire.
HINT:
- Wire 1000 mm (3.28 ft.) or longer and shaped wire are available as supplied parts.
- For wire 1000 mm (3.28 ft.) or less in length, cut or shape 1000 mm (3.28 ft.) wire into the dimensions shown in the illustration.
-
Make sure to read the precautions before preparing the wire.
Click here
Length:
| A | 440 mm (1.44 ft.) |
| B | 250 mm (9.84 in.) |
| C | 170 mm (6.70 in.) |
HINT:
The dimensions shown in the illustration are the lengths.
31. INSTALL SEPARATE TYPE FRONT SEAT CUSHION COVER LH
HINT:
-
When installing the seat cover, refer to the precautions in order to prevent wrinkles from forming.
Click here
- Align the seam allowance in a single direction as shown in the illustration.
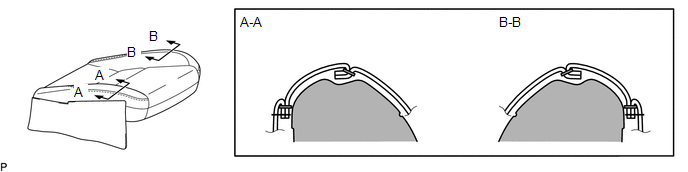
| (a) Using hog ring pliers, install the separate type front seat cushion cover LH to the separate type front seat cushion pad LH with 4 new hog rings in the order indicated in the illustration. NOTICE:
|
|
| (b) Return the seat cover wire to its original position. HINT: Use the same procedure for both seat cover wires. |
|

| (c) Using hog ring pliers, install the separate type front seat cushion cover LH to the separate type front seat cushion pad LH with 14 new hog rings in the order indicated in the illustration. NOTICE:
|
|

| (d) Using hog ring pliers, install 2 new hog rings. NOTICE:
|
|
32. INSTALL SEPARATE TYPE FRONT SEAT CUSHION COVER WITH PAD LH
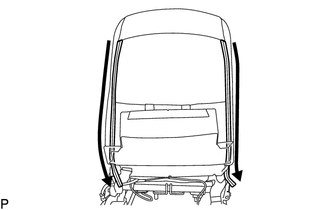
(a) Temporarily install the separate type front seat cushion cover with pad LH.
(b) Attach the 10 hooks.
(c) Attach the 3 hooks.
.png)
(d) w/ Seat Heater System:
(1) Attach the 3 clamps to connect the seat heater wire harness.
(2) Connect the connector.
| (3) Attach the clamp to connect the seat heater wire harness. |
|
.png)
(4) Connect the connector.
(e) Attach the fastening tape to connect the front seat side airbag wire harness.
.png)
.png) | Fastening Tape |
33. INSTALL FRONT INNER SEAT CUSHION SHIELD LH
| (a) Detach the 3 guides and 2 claws to install the front inner seat cushion shield LH. |
|
34. INSTALL FRONT LUMBAR POWER SEAT SWITCH
Click here
35. INSTALL FRONT POWER SEAT SWITCH LH
Click here
36. INSTALL FRONT SEAT CUSHION SHIELD LH
(a) for Driver Side, w/o Memory:
(1) Connect the 2 connectors.
(2) Attach the 3 clamps to connect the wire harness.
(3) Attach the 3 claws to close the wire harness cover.
(b) for Driver Side, w/ Memory:
(1) Connect the 3 connectors.
(2) Attach the 3 clamps to connect the wire harness.
(3) Attach the 3 claws to close the wire harness cover.
(c) for Front Passenger Side:
(1) Connect the connector.
(2) Attach the 3 clamps to connect the wire harness.
(3) Attach the 3 claws to close the wire harness cover.
| (d) Attach the 4 guides, clip and claw to install the front seat cushion shield LH. |
|
(e) Attach the 2 hooks to connect the 2 rubber bands.
37. INSTALL POWER SEAT SWITCH KNOB LH
| (a) Attach the 2 claws to install the power seat switch knob LH. |
|
38. INSTALL POWER SEAT SWITCH KNOB LH
| (a) Attach the 2 claws to install the power seat switch knob LH. |
|
39. INSTALL FRONT LOWER SEAT CUSHION SHIELD
| (a) Attach the clip, 2 claws B and guide, to install the front lower seat cushion shield. |
|
(b) Attach the claw A.
(c) Install the screw.
40. INSTALL SEAT ADJUSTER COVER CAP LH
(a) Install the 2 seat adjuster cover caps to the front seat adjuster assembly LH.
41. INSTALL FRONT SEAT INNER BELT ASSEMBLY LH (for Driver Side)
Click here
42. INSTALL FRONT SEAT INNER BELT ASSEMBLY RH (for Front Passenger Side)
Click here
READ NEXT:
 Installation
INSTALLATION CAUTION / NOTICE / HINT CAUTION: Wear protective gloves. Sharp areas on the parts may injure your hands. HINT:
Use the same procedure for the RH and LH sides.
The procedure listed be
Components
COMPONENTS ILLUSTRATION *A for Driver Side *B for Front Passenger Side *1 FRONT INNER SEAT CUSHION SHIELD LH *2 FRONT LOWER SEAT CUSHION SHIELD *3 FRONT SEAT CUSHION SHIELD L
SEE MORE:
Lost Communication with Cruise Control Front Distance Range Sensor Single Sensor or Center Missing Message (U023587)
DESCRIPTION The forward recognition camera communicates with the millimeter wave radar sensor assembly via CAN communication. If a communication malfunction between the forward recognition camera and millimeter wave radar sensor assembly is detected, DTC U023587 is stored. DTC No. Detection Ite
Initialization
INITIALIZATION INITIALIZE SLIDING ROOF SYSTEM NOTICE:
When the roof glass is adjusted or removed/installed, or the sliding roof drive gear sub-assembly is replaced, the glass position cannot be determined and the sliding roof drive gear sub-assembly must be initialized (pulse sensor initial posit
