Lexus NX: Removal
REMOVAL
PROCEDURE
1. REMOVE DECK BOARD ASSEMBLY
Click here .gif)
2. REMOVE NO. 3 DECK BOARD SUB-ASSEMBLY
Click here
3. REMOVE REAR DECK FLOOR BOX
Click here
4. REMOVE DECK FLOOR BOX LH
Click here
5. PRECAUTION
CAUTION:
Be sure to read Precaution thoroughly before serving.
Click here
NOTICE:
After turning the power switch off, there may be a waiting time before disconnecting the negative (-) auxiliary battery terminal.
Click here
6. DISCONNECT CABLE FROM NEGATIVE AUXILIARY BATTERY TERMINAL
CAUTION:
- Wait at least 90 seconds after disconnecting the cable from the negative (-) auxiliary battery terminal to disable the SRS system.
- If the airbag deploys for any reason. it may cause a serious accident.
7. REMOVE RADIO RECEIVER ASSEMBLY WITH BRACKET
Click here
8. REMOVE STEREO COMPONENT EQUALIZER ASSEMBLY WITH BRACKET
| (a) Remove the 2 bolts and detach the 2 guides. |
|
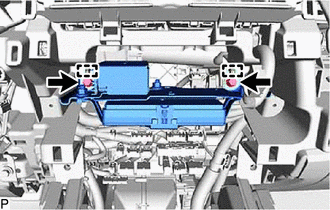
(b) Disconnect all the connectors and remove the stereo component equalizer assembly with bracket.
9. REMOVE STEREO COMPONENT EQUALIZER ASSEMBLY
| (a) Remove the 2 nuts and stereo component equalizer assembly. |
|

READ NEXT:
 Installation
INSTALLATION PROCEDURE 1. INSTALL STEREO COMPONENT EQUALIZER ASSEMBLY (a) Install the stereo component equalizer assembly with 2 nuts. 2. INSTALL STEREO COMPONENT EQUALIZER ASSEMBLY WITH BRACKET (a
Asc Speaker
ComponentsCOMPONENTS ILLUSTRATION *1 NO. 1 SPEAKER ASSEMBLY WITH BOX - - RemovalREMOVAL PROCEDURE 1. REMOVE CONSOLE BOX ASSEMBLY Click here 2. REMOVE NO. 1 SPEAKER ASSEMBLY WITH BOX
SEE MORE:
Terminals Of Ecu
TERMINALS OF ECU CHECK FOLD SEAT CONTROL ECU (REAR RIGHT SEAT) (a) Disconnect the h3 and h4 fold seat control ECU (rear right seat) connectors. (b) Measure the resistance and voltage according to the value(s) in the table below. Terminal No. (Symbol) Wiring Color Terminal Description Condi
Removal
REMOVAL PROCEDURE 1. PRECAUTION Click here 2. REMOVE FRONT BUMPER COVER (a) for Sport Pacakge: Click here (b) except Sport Pacakge: Click here 3. REMOVE NO. 3 ENGINE ROOM WIRE (a) for Sport Pacakge: Click here (b) except Sport Pacakge: Click here 4. REMOVE FRONT CORNER ULTRASONIC SENSOR
