Lexus NX: Removal
REMOVAL
PROCEDURE
1. REMOVE BACK DOOR CENTER GARNISH
Click here .gif)
2. REMOVE BACK DOOR SIDE GARNISH LH
Click here
3. REMOVE BACK DOOR SIDE GARNISH RH
Click here
4. REMOVE BACK DOOR TRIM BASE
Click here
5. REMOVE PULL HANDLE
Click here
6. REMOVE BACK DOOR LOCK COVER
Click here
7. REMOVE BACK DOOR TRIM BOARD ASSEMBLY
Click here
8. REMOVE MULTIPLEX NETWORK DOOR ECU
(a) Remove the 2 bolts.
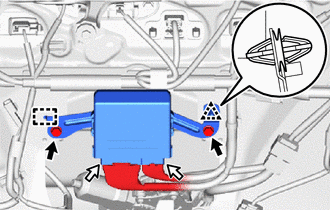
.png) | Bolt |
.png) | Connector |
(b) Detach the clip and guide, and remove the multiplex network door ECU.
NOTICE:
Be careful when removing the multiplex network door ECU may fall and become damaged.
(c) Disconnect the 2 connectors.
READ NEXT:
 Installation
INSTALLATION PROCEDURE 1. INSTALL MULTIPLEX NETWORK DOOR ECU (a) Connect the 2 connectors. Bolt Connector (b) Attach the guide and clip to install the multiplex network door ECU. NOTI
Parts Location
PARTS LOCATION ILLUSTRATION *1 BACK DOOR OPENER SWITCH ASSEMBLY *2 MULTIPLEX NETWORK DOOR ECU *3 BACK DOOR LOCK ASSEMBLY *4 BACK DOOR LOCK MOTOR *5 LATCH SWITCH *6 PAWL S
SEE MORE:
Air conditioning filter
The air conditioning filter must be
changed regularly to maintain air
conditioning efficiency.
Removal method
1. Turn the power switch off.
2. Open the glove box. Slide off the
damper.
3. Push in the glove box on the vehicle's
outer side to disconnect the
claws. Then pull out the glove
Installation
INSTALLATION CAUTION / NOTICE / HINT HINT:
Use the same procedure for RHD and LHD vehicles.
The procedure listed below is for LHD vehicles.
PROCEDURE 1. INSTALL COOLER THERMISTOR (ROOM TEMPERATURE SENSOR) (a) Connect the aspirator hose. (b) Connect the connector. (c) Attach the 2 claws to in
© 2016-2026 Copyright www.lexunx.com
